leadscloud

Google SEO|外贸营销推广

开机后会一直卡在这个界面

1
Cloud-init v. 18.4-0ubuntu1~18.04.1 running 'modules:config' at Fri, 24 Jul 2020 

single模式进入ubuntu

  1. 开机时长按Shift

  2. 出现grub选项,选中ubuntu

  3. 长按e

  4. 找到类似下面的代码

1
2
3
linux /boot/vmlinuz-3.2.0-24-generic root=UUID=bc6f8146-1523-46a6-8b\
6a-64b819ccf2b7 ro quiet splash
initrd /boot/initrd.img-3.2.0-24-generic
  1. ro quiet splash 这后面,加上 single

  2. Ctrl+xF0 进入系统

参考: https://askubuntu.com/questions/132965/how-do-i-boot-into-single-user-mode-from-grub

Ubuntu的网卡设置

sudo vim /etc/netplan/50-cloud-init.yam

1
2
3
4
5
6
7
8
9
10
# This file is generated from information provided by
# the datasource. Changes to it will not persist across an instance.
# To disable cloud-init's network configuration capabilities, write a file
# /etc/cloud/cloud.cfg.d/99-disable-network-config.cfg with the following:
# network: {config: disabled}
network:
ethernets:
enp3s0:
dhcp4: true
version: 2

enp3s0 如果错了,改下,我的是因为硬盘换了另一台电脑,有变化,导致ip获取失败。

ifconfig -a 可以显示所有网卡。

设置静态ip

1
2
3
4
5
6
7
8
9
10
network:
ethernets:
enp3s0: # 配置的网卡名称
dhcp4: no # 关闭dhcp4
dhcp6: no # 关闭dhcp6
addresses: [192.168.0.120/24] # 设置本机IP地址及掩码
gateway4: 192.168.0.1 # 设置网关
nameservers:
addresses: [114.114.114.114, 8.8.8.8] # 设置DNS
version: 2

配置完成后,保存并退出,执行 netplan apply 命令可以让配置直接生效

ifconfig -a 可以看下是否成功

重新启停以太网卡命令:

ifconfig enp3s0 down

ifconfig enp3s0 up

参考: https://www.cnblogs.com/opsprobe/p/9979234.html

安装Java11

1
yum install java-11-openjdk -y
1
2
3
4
5
java -version

openjdk version "11.0.5" 2019-10-15 LTS
OpenJDK Runtime Environment 18.9 (build 11.0.5+10-LTS)
OpenJDK 64-Bit Server VM 18.9 (build 11.0.5+10-LTS, mixed mode, sharing)

安装Tomcat

1
2
3
4
wget http://mirrors.tuna.tsinghua.edu.cn/apache/tomcat/tomcat-9/v9.0.27/bin/apache-tomcat-9.0.27.tar.gz
tar xzf apache-tomcat-9.0.27.tar.gz
mv apache-tomcat-9.0.27 /usr/local/tomcat9

启动tomcat

1
2
cd /usr/local/tomcat9/
./bin/startup.sh

输出示例

1
2
3
4
5
6
Using CATALINA_BASE:   /usr/local/tomcat9
Using CATALINA_HOME: /usr/local/tomcat9
Using CATALINA_TMPDIR: /usr/local/tomcat9/temp
Using JRE_HOME: /usr
Using CLASSPATH: /usr/local/tomcat9/bin/bootstrap.jar:/usr/local/tomcat9/bin/tomcat-juli.jar
Tomcat started.

最后浏览器中输入 http://localhost:8080 即可访问tomcat服务器了。

war文件部署

打war包

项目名称为mygoodcache

eclipse中项目上右键 export-->war file -->Browse(指定打完的包存放路径)-->finish mygood.war包已经完成

部署到tomcat

  • 找到tomcat的安装路径(如:/usr/local/tomcat9/
  • webapps文件夹中如果有war包及文件夹都删除
  • /usr/local/tomcat9/webapps 中上传新的war包
  • /usr/local/tomcat9/bin/startup.bat 启动tomcat

安装lnmp

https://lnmp.org/install.html

创建数据库

CREATE DATABASE crawler_pool CHARACTER SET utf8mb4 COLLATE utf8mb4_unicode_ci;

导入数据库

mysql -p crawler_pool < mygood.sql

Godaddy是流行的域名注册,虽然有些垃圾,但注册域名有时还是可以的。它有API可使用,以购买域名,大部分域名还是可以购买的。

但如果你账户中没有余额,是无法使用API购买的,这篇文章介绍如何向Godaddy中预充值。

注意:使用Godaddy的API买域名是无法使用优惠券的。

API有时也会买域名失败,虽然大部分情况下会自动退款,但也有不退款的情况发生,对于我来说.co.za的域名发生过这种情况,你需要特别提醒godaddy给你处理。

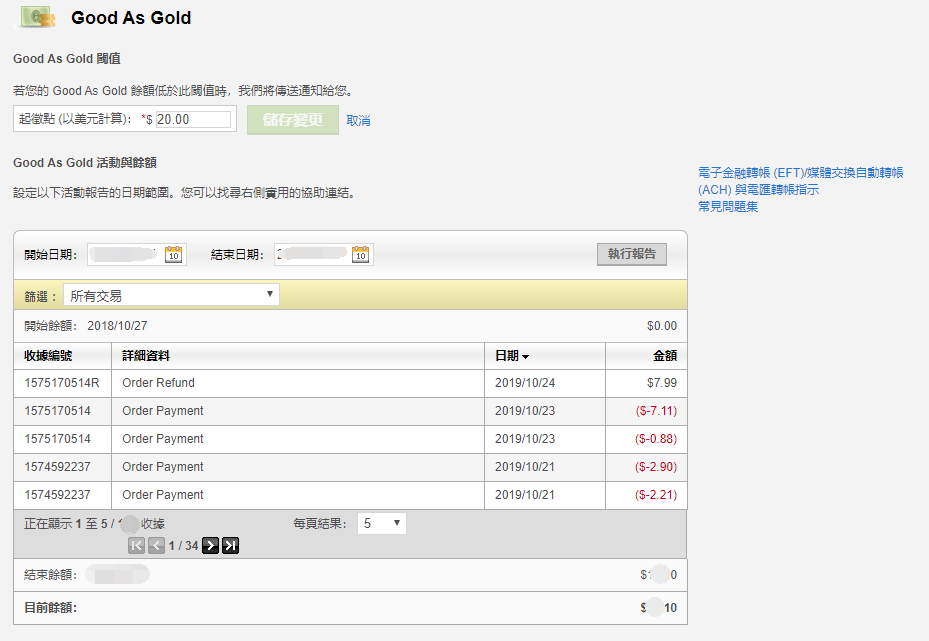
这种充值方式是没有发票的,在Godaddy中账户中,你无法找到对应的billing记录。只会在Good As Gold中显示一个收据编号,然后一个充值提示,不会和买域名时一样,会生成一个详情的订单记录。

向GoDaddy中预存款,以使用API注册域名

Godaddy中有一个Good As Gold付款方式。在 账户设定,付款方式中可以看到。

https://account.godaddy.com/payment-methods

image-20191028141636275

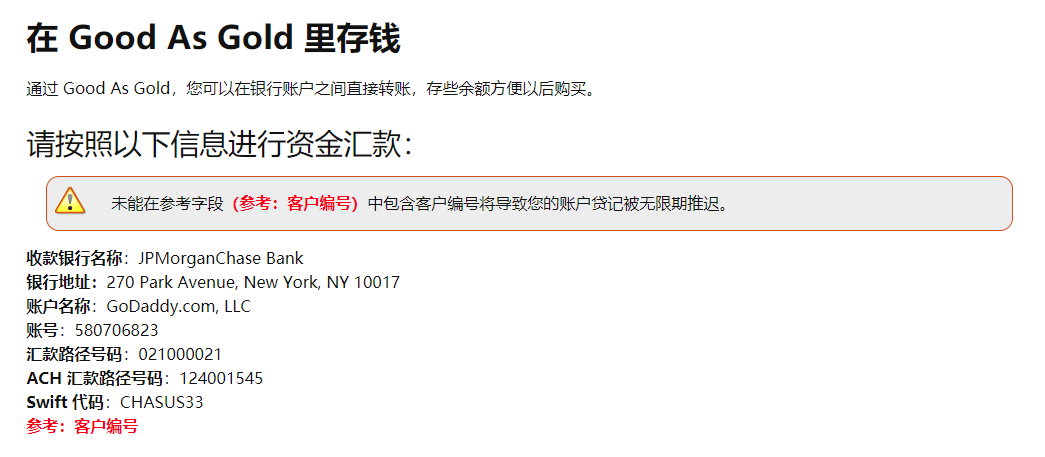
你可以参考以下链接阅读Godaddy的帮助,通过向godaddy的银行账号转账,以达到预存款目的。这个账号,在下面的支付宝中会使用。

https://sg.godaddy.com/zh/help/good-as-gold-727

image-20191028140809338

收款银行名称:JPMorganChase Bank
**银行地址:**270 Park Avenue, New York, NY 10017
账户名称:GoDaddy.com, LLC
账号:580706823
汇款路径号码:021000021
ACH 汇款路径号码:124001545
Swift 代码:CHASUS33
参考:客户编号

支付宝付款流程图

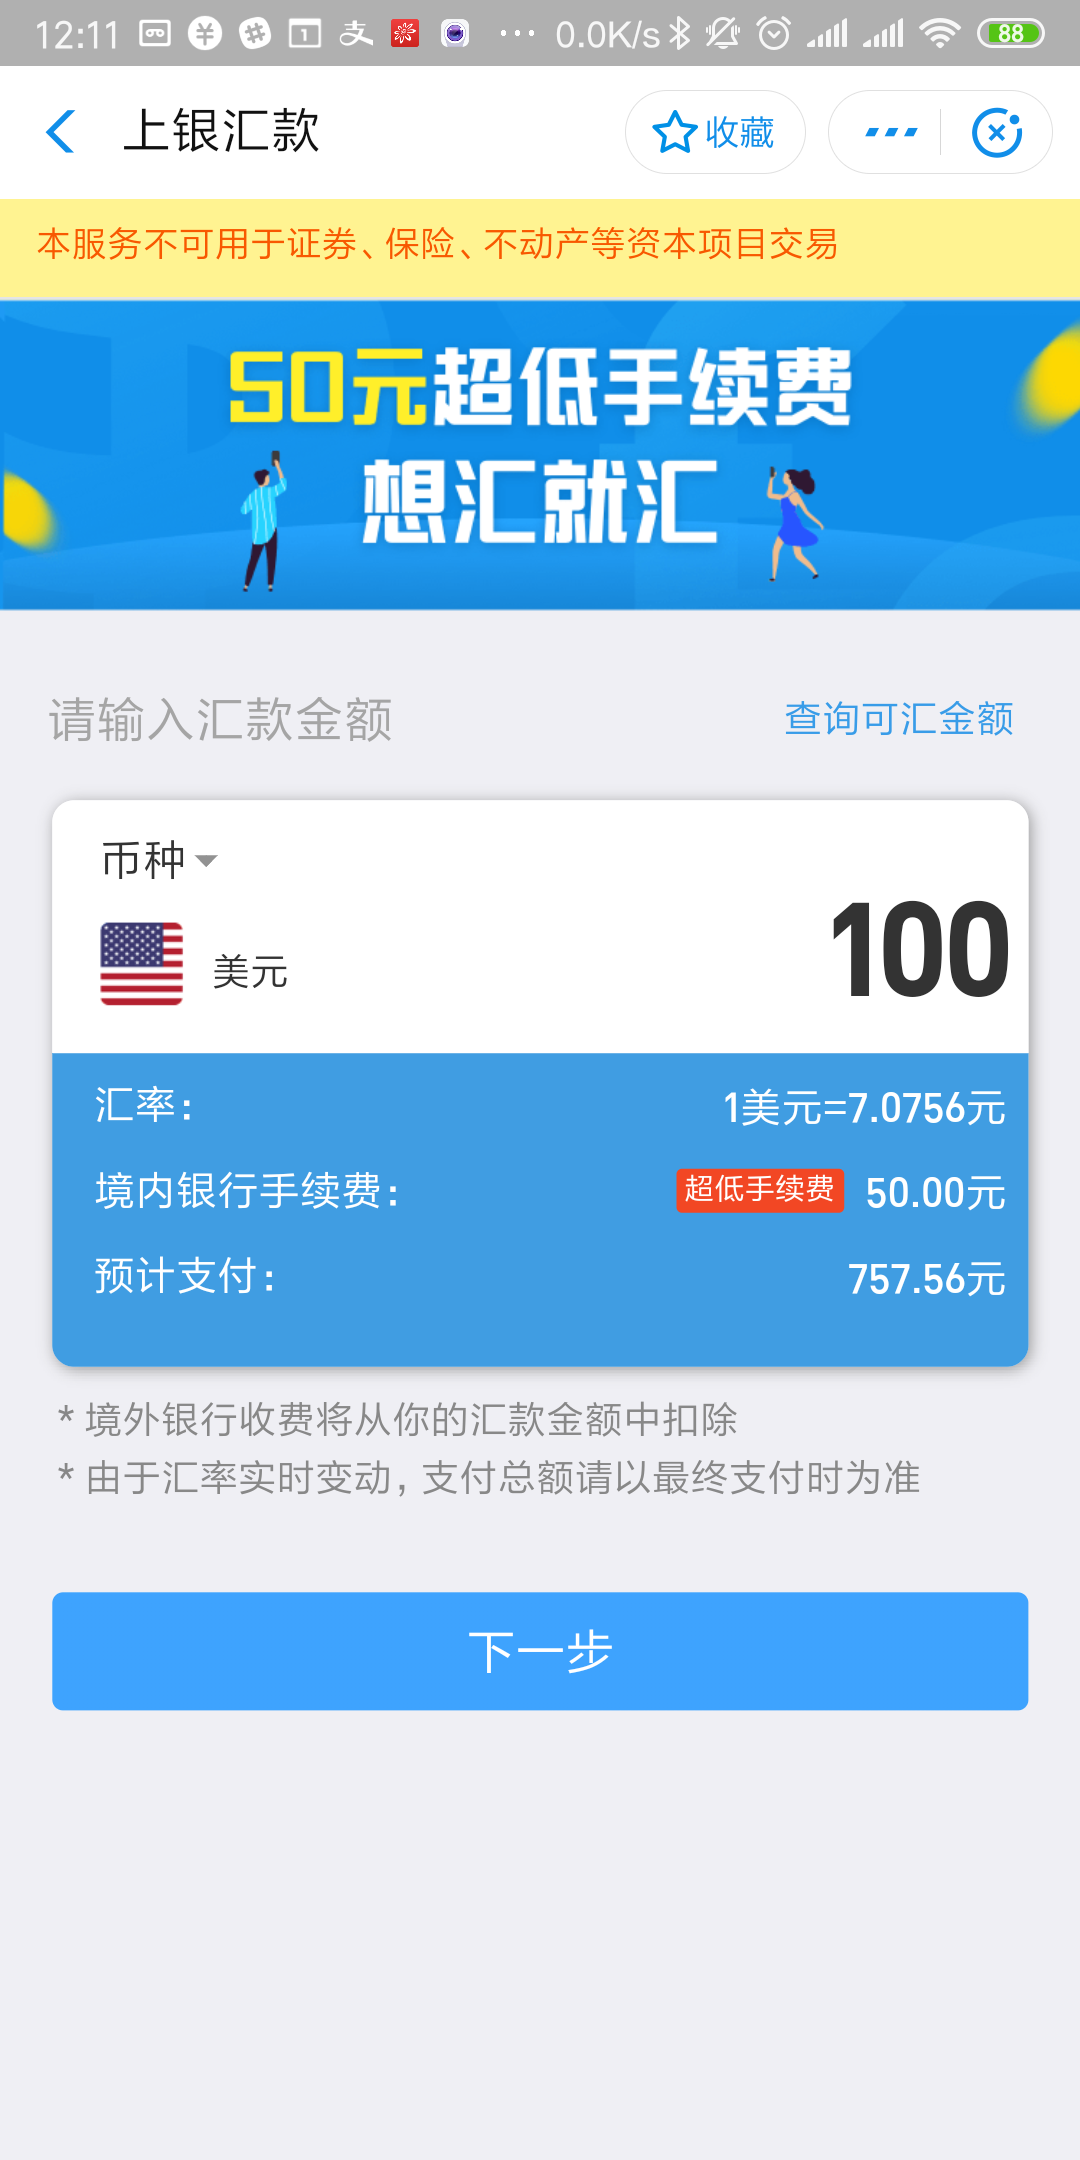
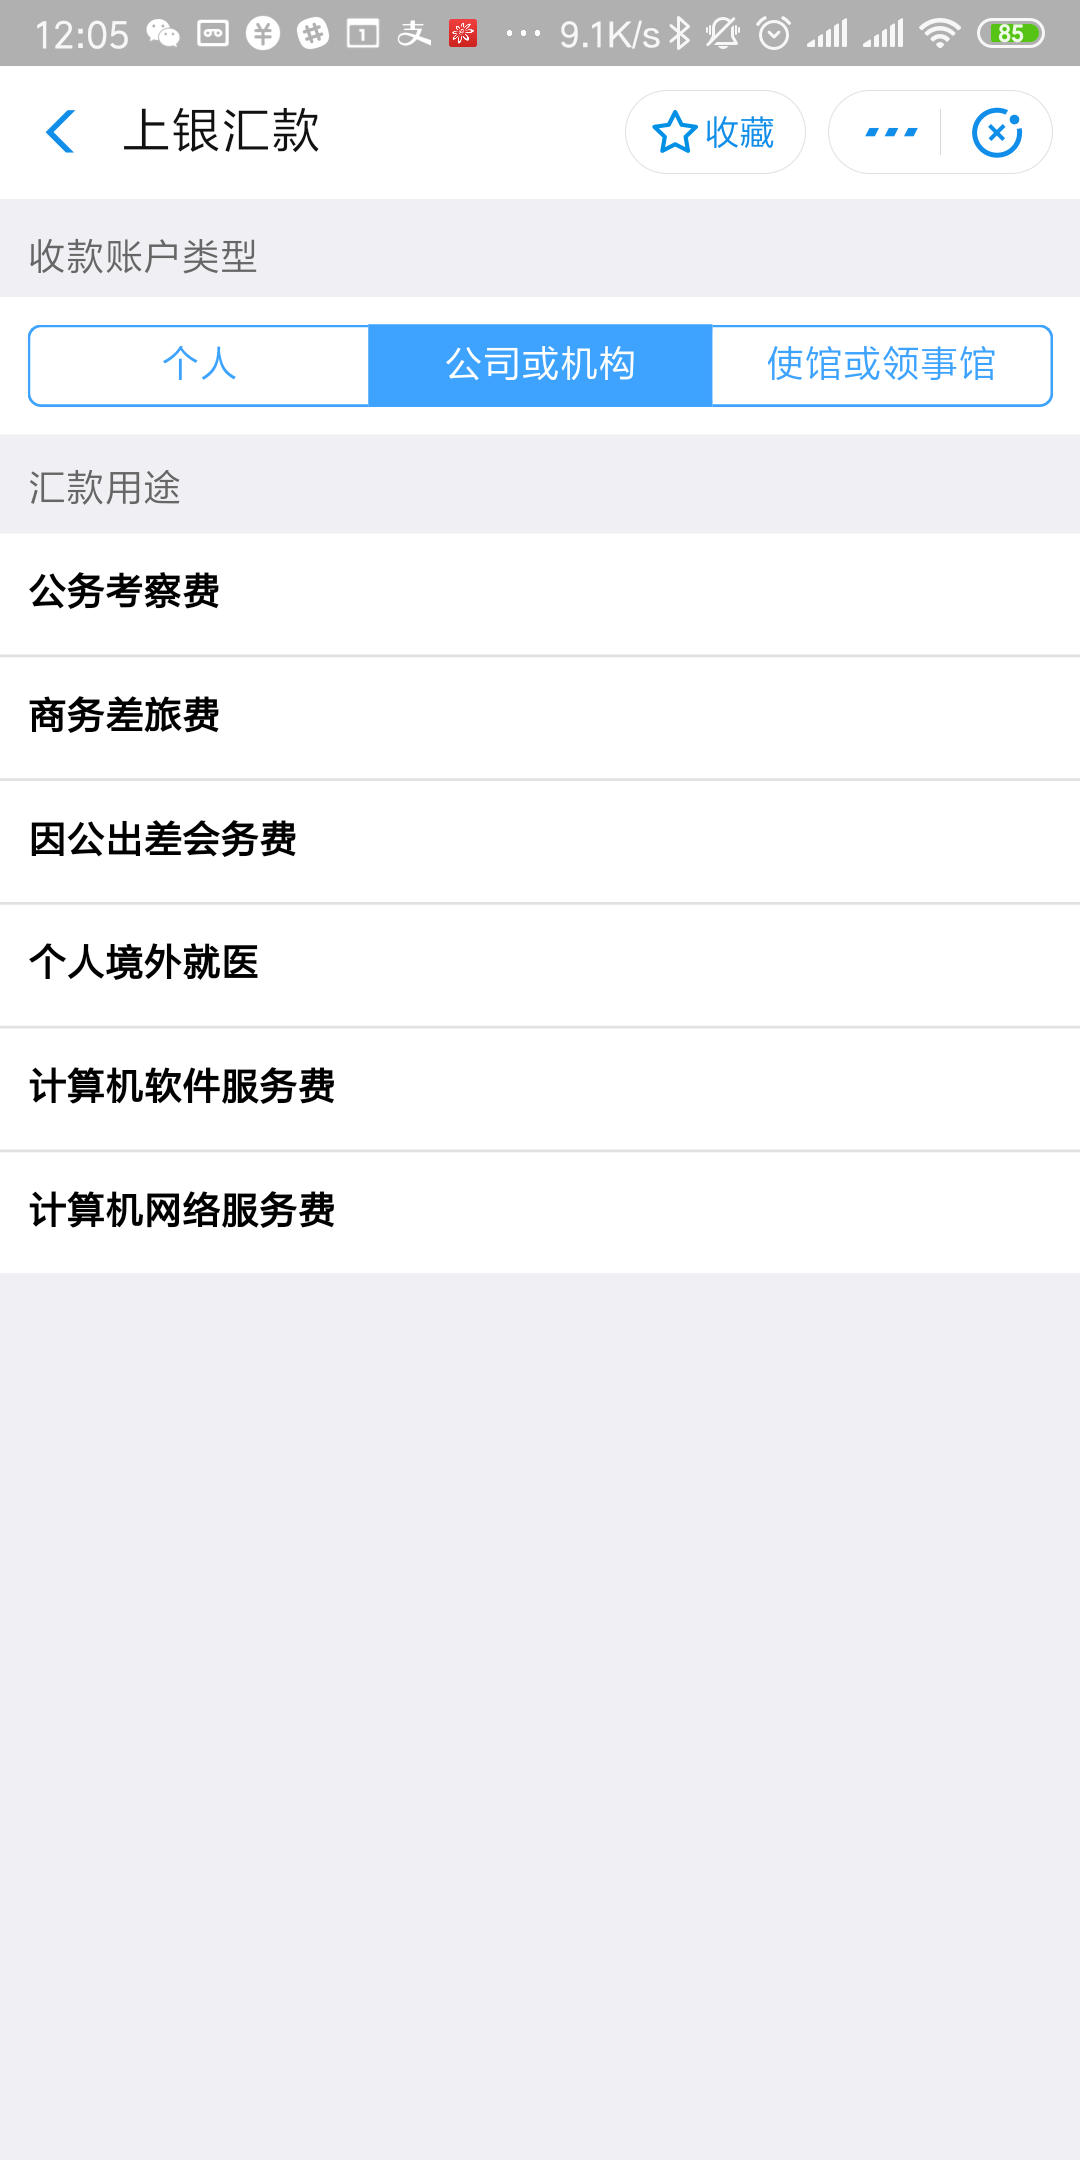
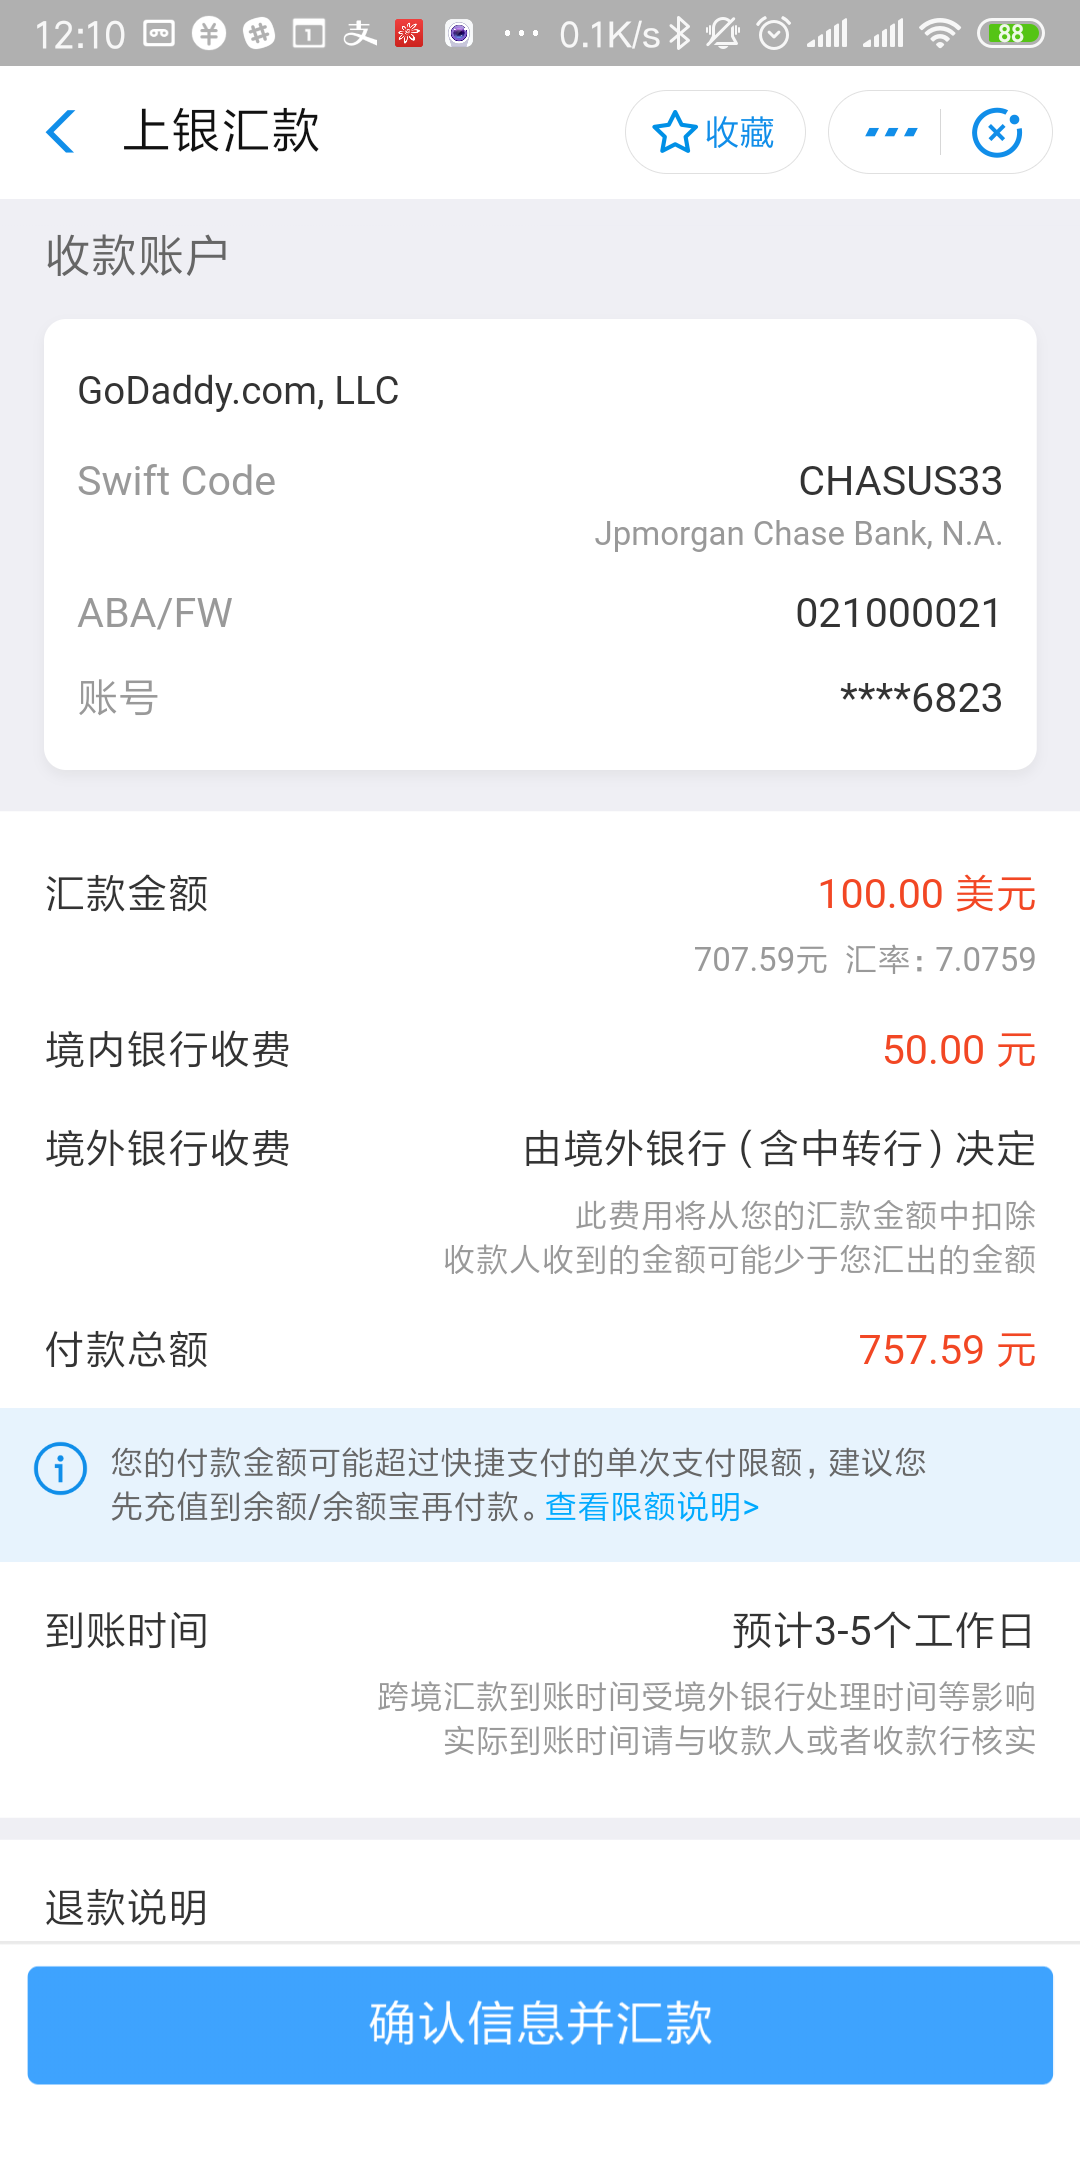
先在支付宝里搜索上银汇款,打开上银汇款,如下界面,最低100美元起步。

手续费是每次50,无论你汇多少,它都是按次收费的,所以单次可以多汇一点,会省点手续费。

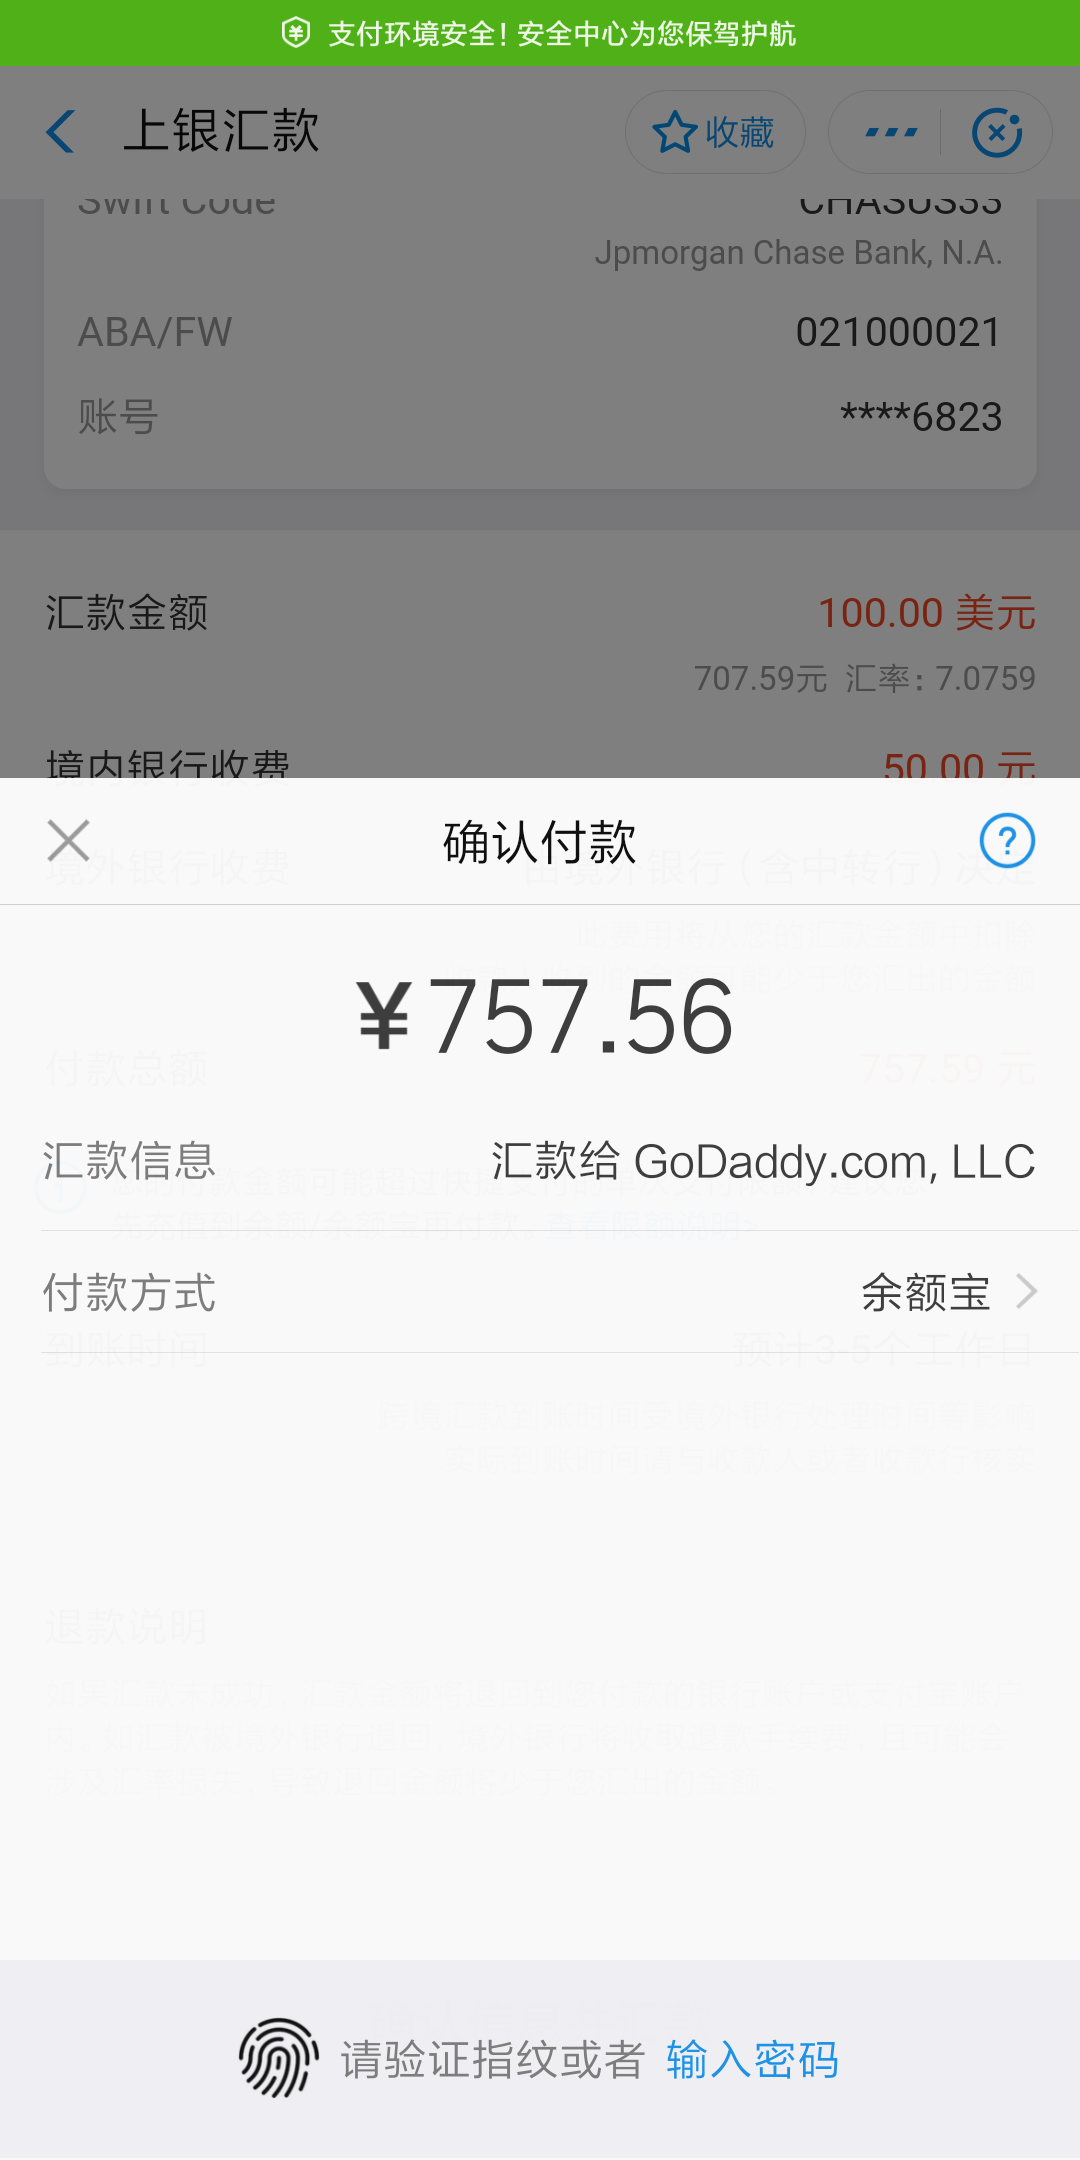
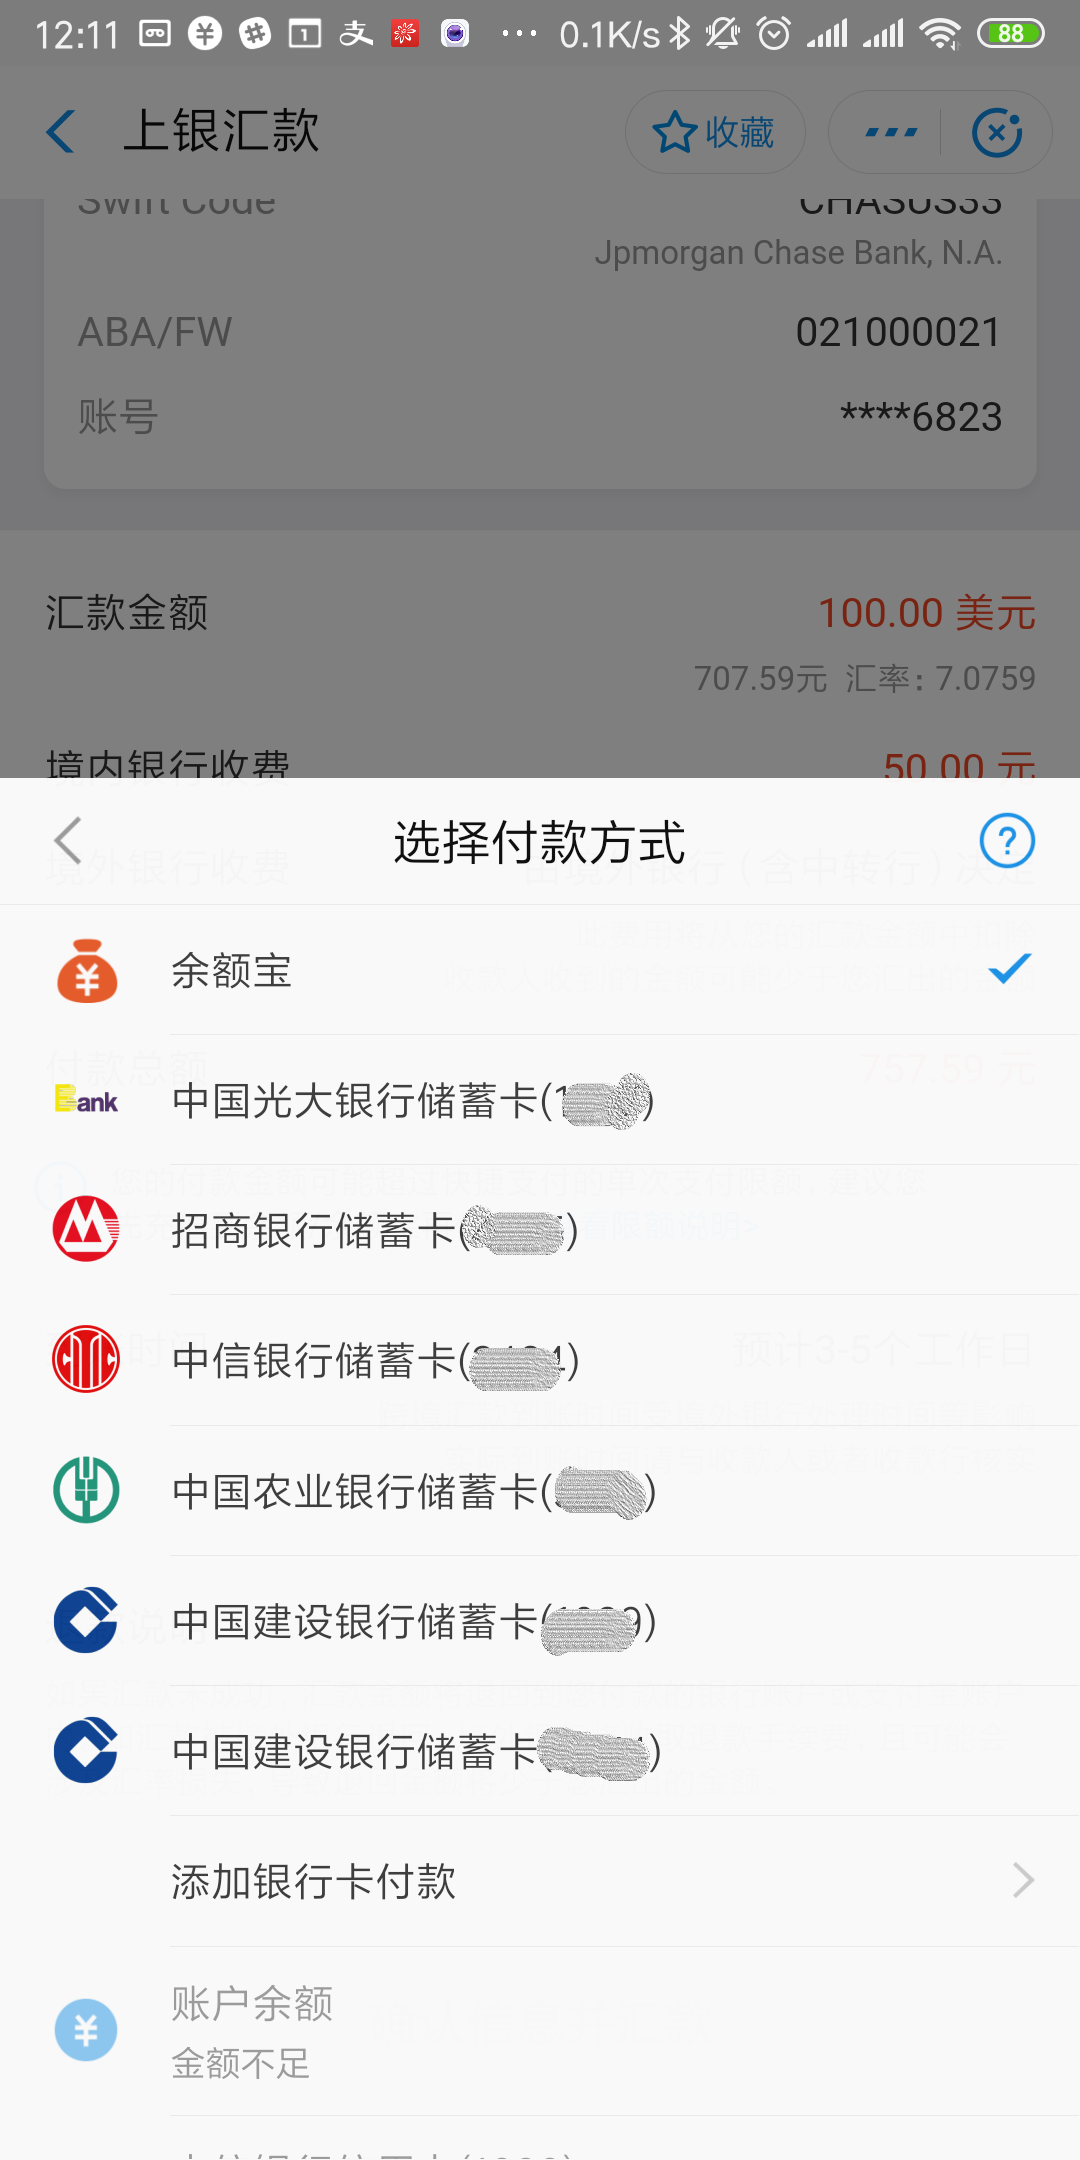
支付宝美元汇款,不支持信用卡,只能是银行卡或余额宝。

image-20191028135048071

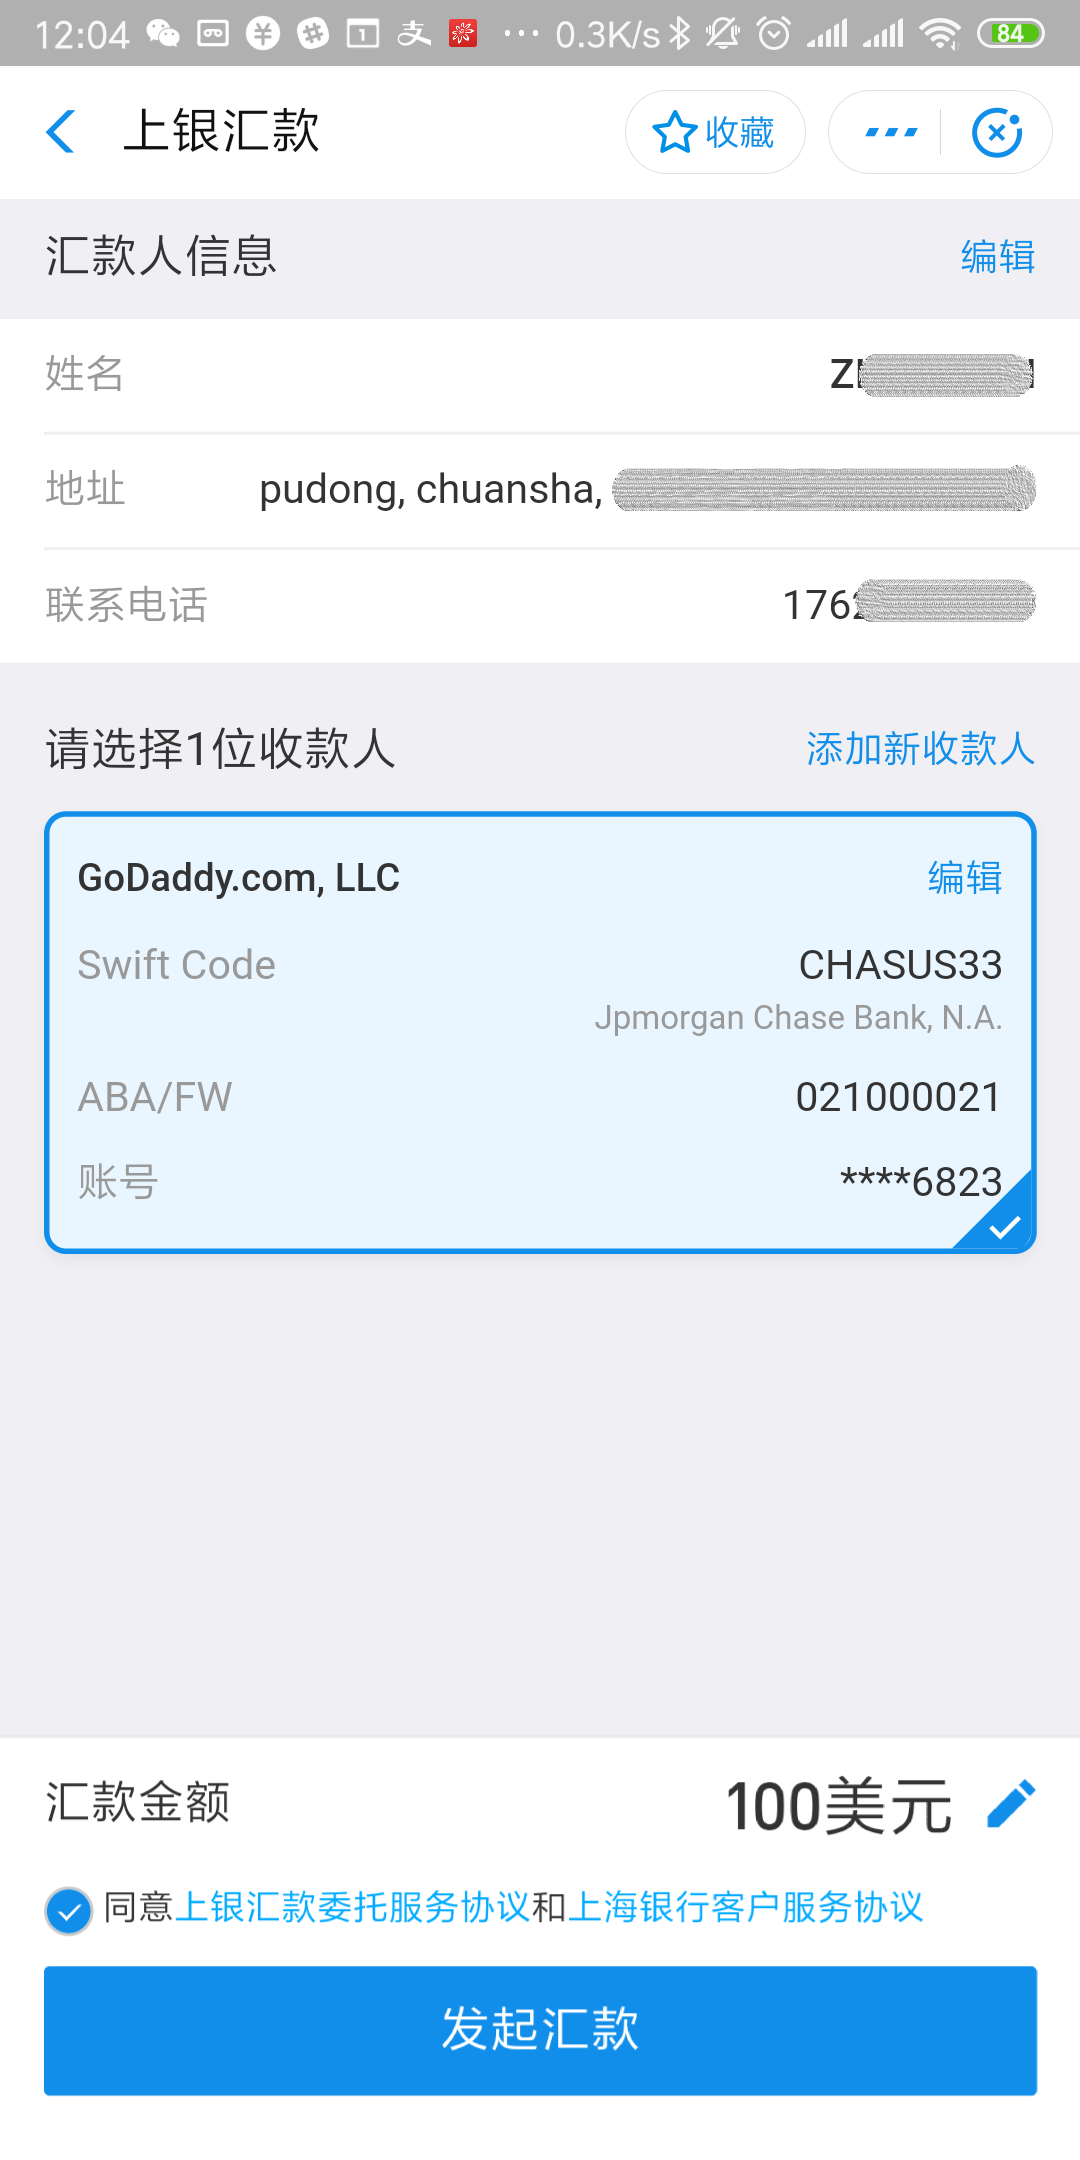
我已经添加了联系人,如果你是第一次汇款,需要按godaddy的帮助说明,添加godaddy的银行账号

https://sg.godaddy.com/zh/help/good-as-gold-727

image-20191028135201586

选择计算机网络服务费

image-20191028135210797

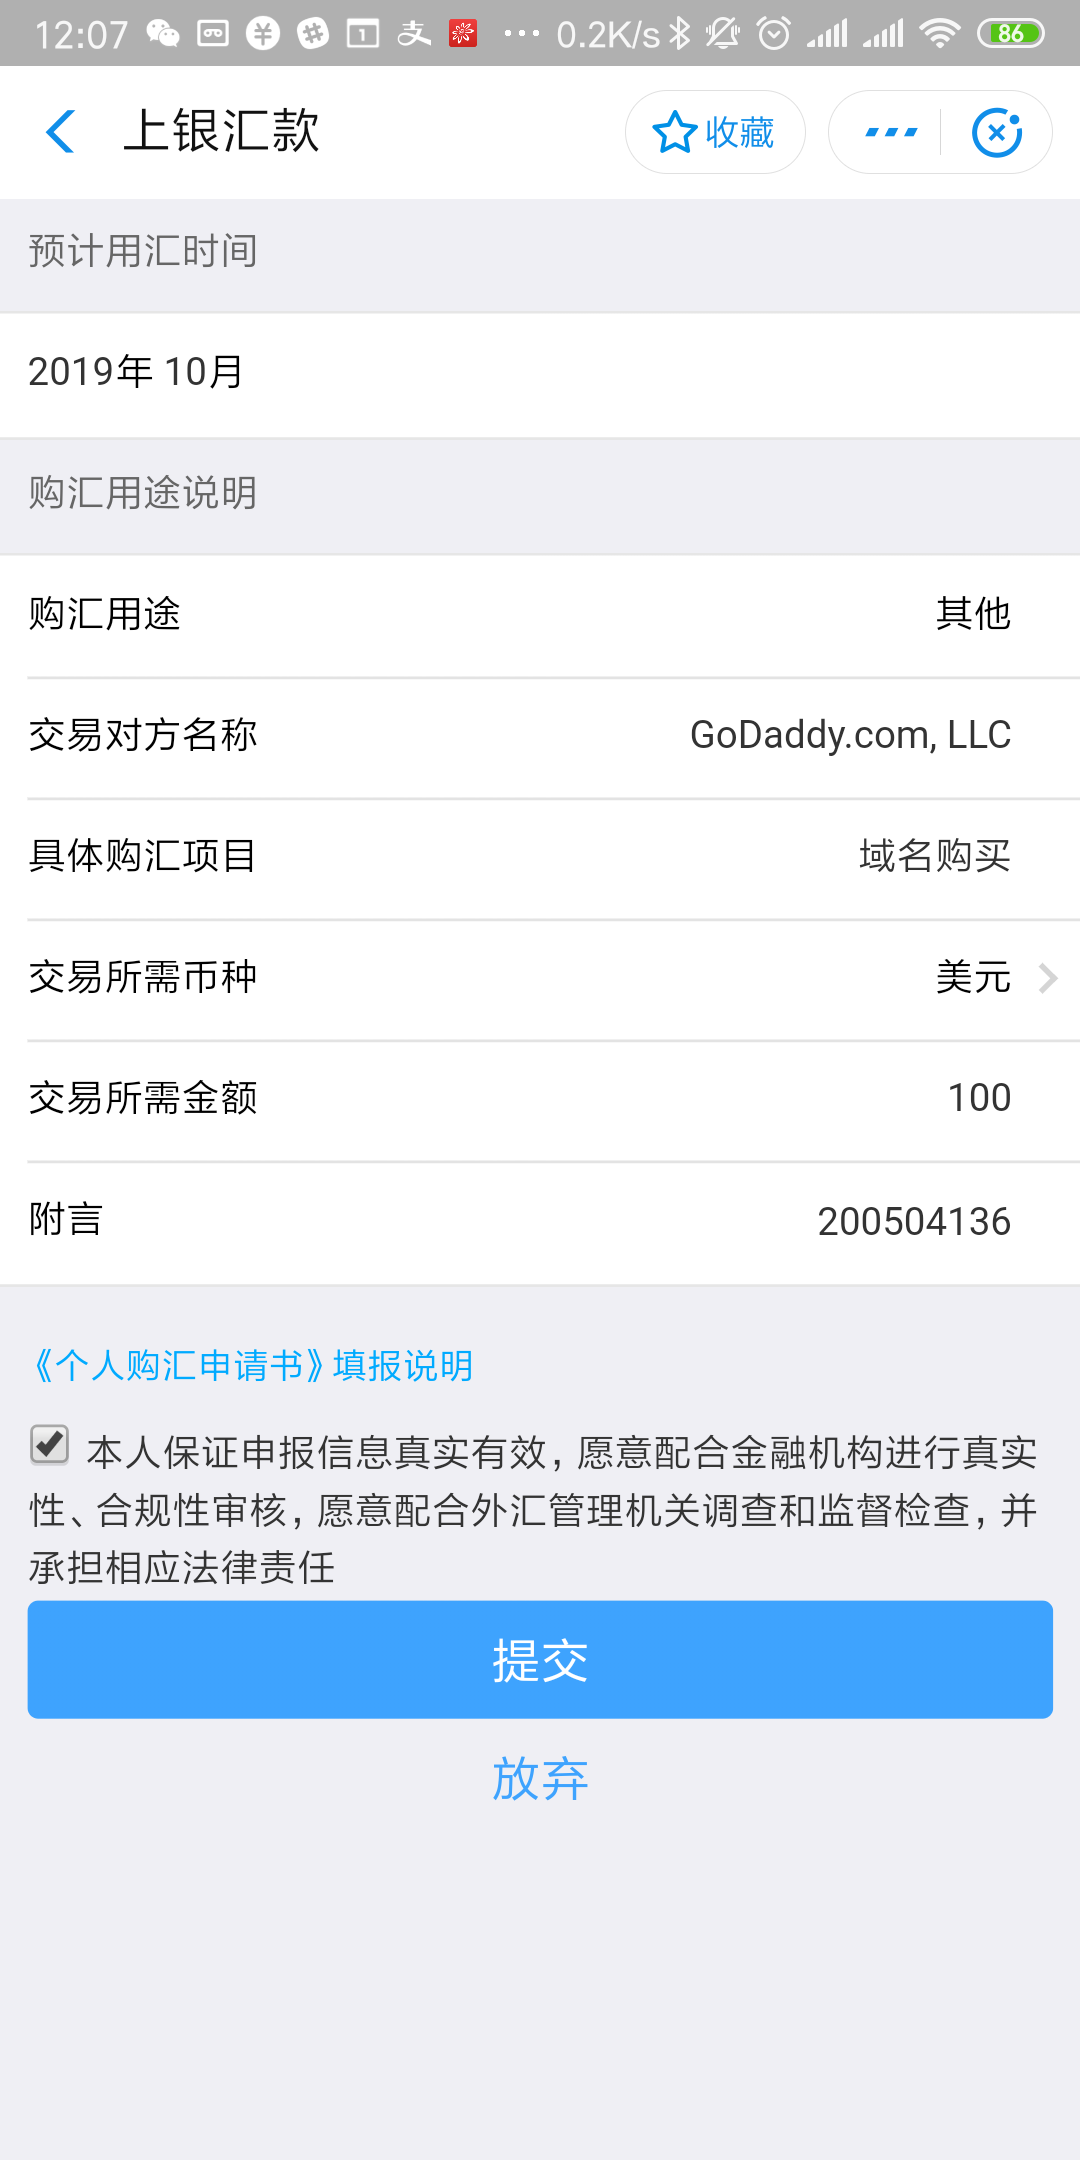
下面这一项,需要手动填写,并且要注意不要弄错,否则会失败。

交易对方名称:GoDaddy.com, LLC

具体购汇项目:域名购买

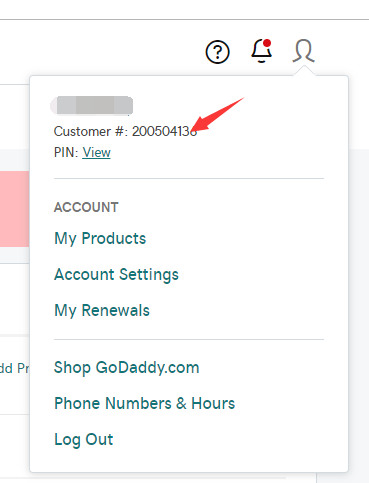
附言:这个是你的Godaddy账号 (Customer id)

登陆你的Godaddy账号,可以点击右上角你的头像,会看到Customer id

附言,只需要填写customer id,不要有其它的任何字符,否则会失败。

image-20191028135836822

image-20191028135219882

image-20191028135227517

image-20191028135236330

image-20191028135245963

image-20191028135254666

image-20191028135302802

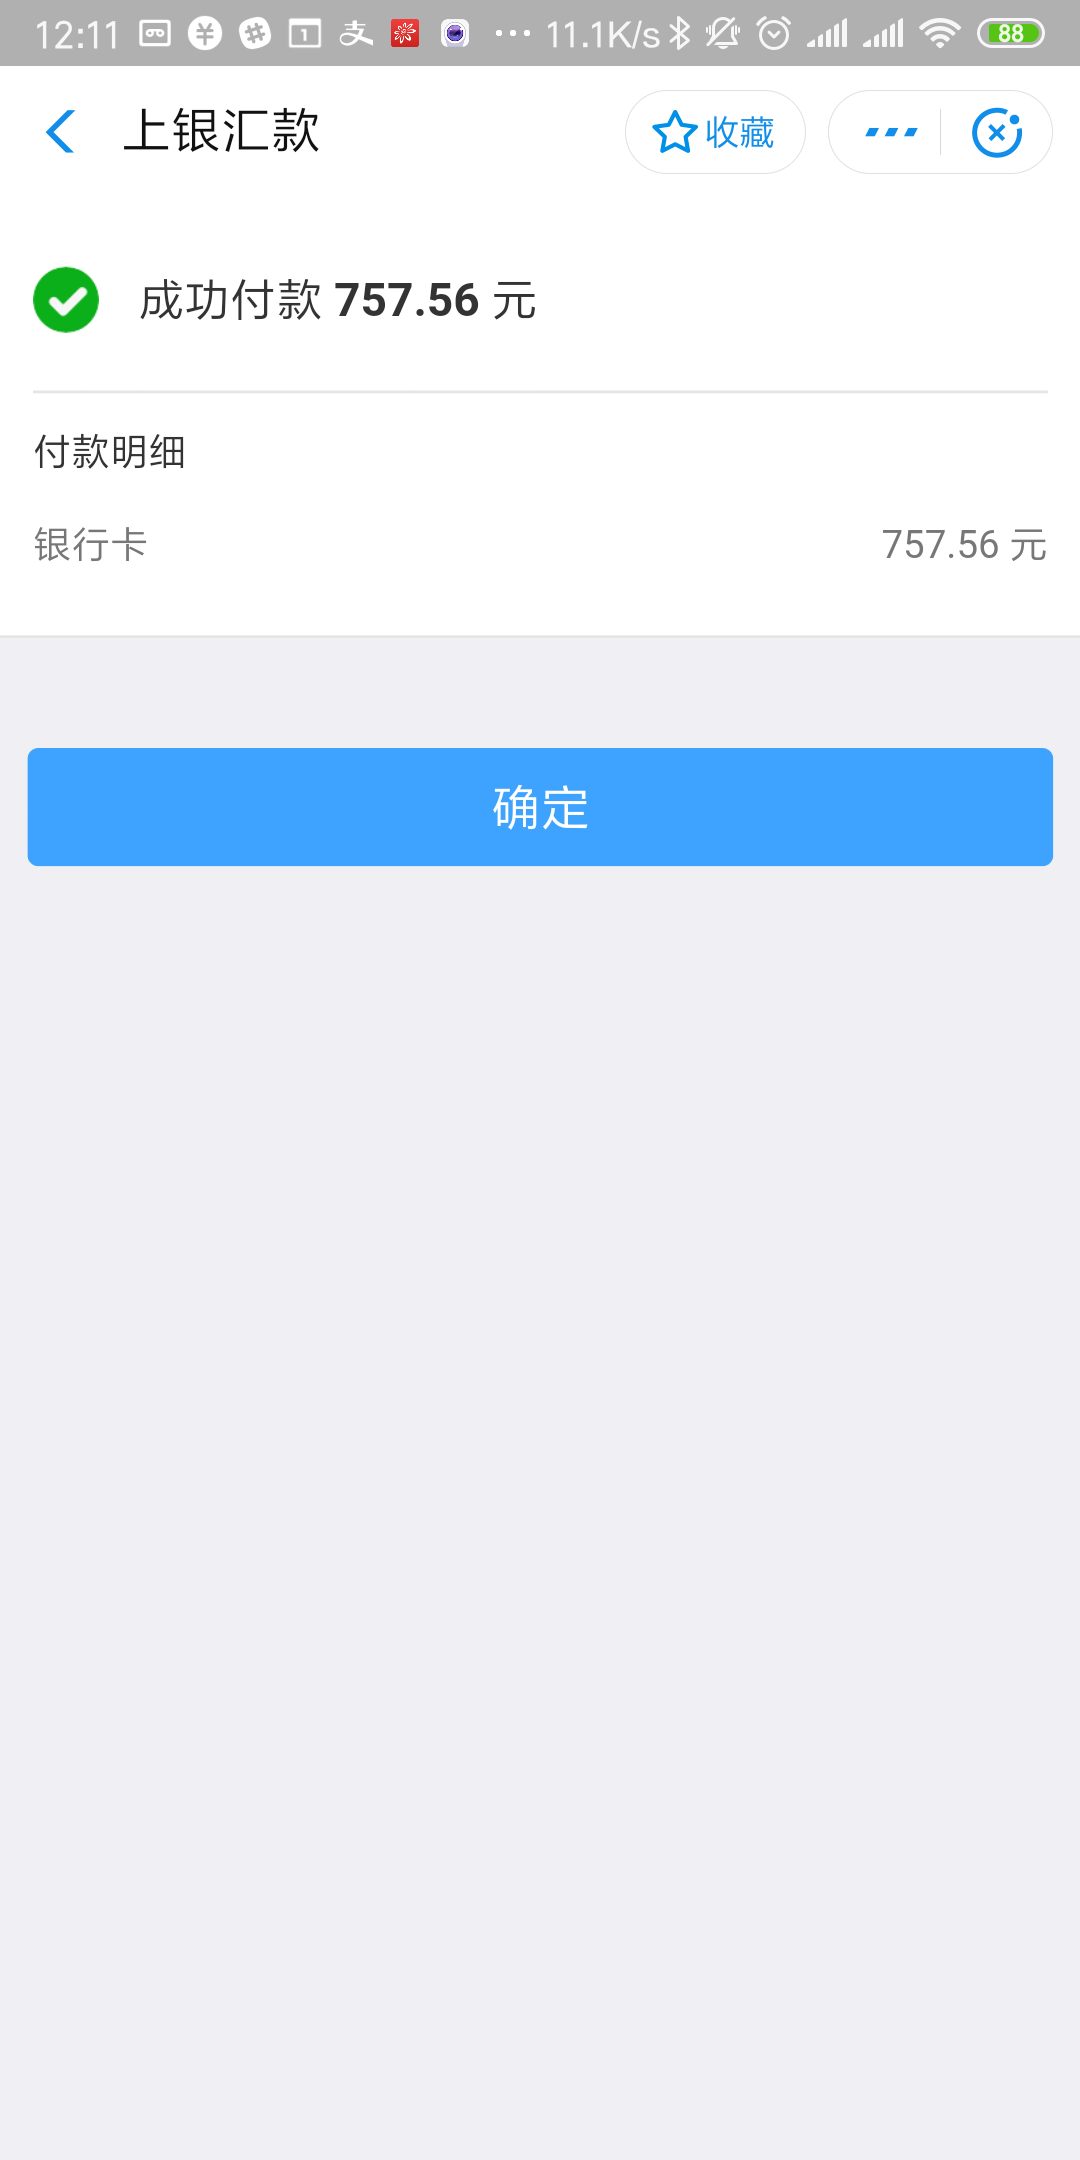
第一次充值后,需要5-7个工作日,但也可能2-3天就可以。

之后再充值2-3天就会到账,但一般不会超过7个工作日。

编辑mysql配置文件 vi /etc/my.cnf,在mysqld下添加一行skip-grant-tables,如下

1
2
3
4
[mysqld]
#...
skip-grant-tables
#...

这样就可以免密登录MySQL

重启MySQL service mysqld restart

在终端中直接输入 mysql 即可进入mysql

切换数据库

use mysql;

输入以下命令

1
update user set authentication_string=password('新密码') where user='root';

MySQL5.7前的版本使用

1
update user set password=password('新密码') where user='root';

上海蓝悉网络科技有限公司,是世邦工业科技集团旗下第三方电子商务服务子公司,也是Google大中华区的合作伙伴。公司成立于2016年6月,位于上海市浦东新区高科东路1688号。

职位 介绍 地点 薪资 日期
海外贸易业务总监 5-7年经验 | 本科 | 招1人 上海-浦东新区 1.5-2万/月 09-23
外贸业务员/国际营销3-4年经验 大专 | 招3人 上海-浦东新区 0.6-2.5万/月 09-26
液体饮料包装机械外贸业务员 3-4年经验 | 大专 | 招2人 上海-浦东新区 0.6-2.5万/月 09-26
太阳能路灯外贸业务员/国贸销售 3-4年经验 | 大专 | 招2人 上海-浦东新区 0.8-2.5万/月 09-26
外贸业务员(代招) 3-4年经验 | 本科 | 招5人 上海-浦东新区 0.5-1万/月 09-26
互联网广告销售主管 2年经验 | 大专 | 招2人 上海-浦东新区 0.6-1万/月 09-26
互联网广告销售顾问 大专 | 招3人 上海-浦东新区 0.6-1.1万/月 09-26
财务会计 3-4年经验 | 大专 | 招1人 上海-浦东新区 0.7-1万/月 09-26
互联网广告营销/销售经理 大专 | 招4人 上海-浦东新区 6-8千/月 09-26
行政人事专员 本科 | 招2人 上海-浦东新区 5-7千/月 09-24
Facebook广告优化师/投放专员 3-4年经验 | 本科 | 招1人 上海-浦东新区 0.8-1万/月 09-24
海外营销顾问 大专 | 招4人 上海-浦东新区 6-8千/月 09-26
SEO专员,SEO工程师 2年经验 | 本科 上海-浦东新区 0.6-1万/月 09-23
网站视觉设计师/网站高级设计师 3-4年经验 | 本科 | 招1人 上海-浦东新区 0.8-1.2万/月 09-03
网站PHP开发工程师|网站前端工程师 3-4年经验 | 本科 | 招1人 上海-浦东新区 0.8-1.5万/月 09-03
网站PHP开发工程师3-4年经验 本科 | 招1人 上海-浦东新区 0.6-1.2万/月 09-03
英文网站策划师 1年经验 | 本科 | 招2人 上海-浦东新区 5-8千/月 09-03
网站视觉设计师/UI设计师 3-4年经验 | 本科 | 招1人 上海-浦东新区 0.8-1.2万/月 09-03
网站前端开发工程师 3-4年经验 | 本科 | 招1人 上海-浦东新区 0.6-1.2万/月 09-03
Google/Facebook海外投放分析师 本科 | 招3人 上海-浦东新区 4.5-8千/月 08-19
行政专员 本科 | 招1人 上海-浦东新区 5-7千/月 08-06
注册资本 100万人民币
实缴资本 -
成立日期 2016-06-08
经营状态 存续
统一社会信用代码 91310117MA1J1CPH26
工商注册号 310117003431883
纳税人识别号 91310117MA1J1CPH26
组织机构代码 MA1J1CPH2
公司类型 有限责任公司(自然人独资)
行业 软件和信息技术服务业
核准日期 2016-06-08
登记机关 浦东新区市场监管局
营业期限 2016-06-08至2026-06-07 纳税人资质 -
人员规模 小于50人
参保人数 25
曾用名 -
英文名称 -
经营范围 从事网络科技、计算机软件领域内的技术开发、技术转让、技术咨询、技术服务,商务信息咨询,各类广告的设计、制作、代理、发布,电子产品、机械设备的销售,从事货物及技术的进出口,企业营销策划,多媒体设计,文化艺术交流活动策划,展览展示服务,企业形象策划,会务服务。【依法须经批准的项目,经相关部门批准后方可开展经营活动】

屏蔽IP

1
2
3
4
5
6
7
8
9
10
11
#屏蔽单个IP的命令是
iptables -I INPUT -s 123.45.6.7 -j DROP

#封整个段即从123.0.0.1到123.255.255.254的命令
iptables -I INPUT -s 123.0.0.0/8 -j DROP

#封IP段即从123.45.0.1到123.45.255.254的命令
iptables -I INPUT -s 124.45.0.0/16 -j DROP

#封IP段即从123.45.6.1到123.45.6.254的命令是
iptables -I INPUT -s 123.45.6.0/24 -j DROP

屏蔽URL

1
iptables -I INPUT -m string --string "bidder?sid=" --algo bm -j DROP

保存规则

1
service iptables save

iptables 选项

1
2
3
4
5
6
7
8
9
10
11
12
13
14
15
16
17
18
19
20
21
22
23
24
25
26
27
28
-t, --table table 对指定的表 table 进行操作, table 必须是 raw, nat,filter,mangle 中的一个。如果不指定此选项,默认的是 filter 表。

# 通用匹配:源地址目标地址的匹配
-p:指定要匹配的数据包协议类型;
-s, --source [!] address[/mask] :把指定的一个/一组地址作为源地址,按此规则进行过滤。当后面没有 mask 时,address 是一个地址,比如:192.168.1.1;当 mask 指定时,可以表示一组范围内的地址,比如:192.168.1.0/255.255.255.0
-d, --destination [!] address[/mask] :地址格式同上,但这里是指定地址为目的地址,按此进行过滤。
-i, --in-interface [!] <网络接口name> :指定数据包的来自来自网络接口,比如最常见的 eth0 。注意:它只对 INPUT,FORWARD,PREROUTING 这三个链起作用。如果没有指定此选项, 说明可以来自任何一个网络接口。同前面类似,"!" 表示取反。
-o, --out-interface [!] <网络接口name> :指定数据包出去的网络接口。只对 OUTPUT,FORWARD,POSTROUTING 三个链起作用。

# 查看管理命令
-L, --list [chain] 列出链 chain 上面的所有规则,如果没有指定链,列出表上所有链的所有规则。

# 规则管理命令
-A, --append chain rule-specification 在指定链 chain 的末尾插入指定的规则,也就是说,这条规则会被放到最后,最后才会被执行。规则是由后面的匹配来指定。
-I, --insert chain [rulenum] rule-specification 在链 chain 中的指定位置插入一条或多条规则。如果指定的规则号是1,则在链的头部插入。这也是默认的情况,如果没有指定规则号。
-D, --delete chain rule-specification -D, --delete chain rulenum 在指定的链 chain 中删除一个或多个指定规则。
-R num:Replays替换/修改第几条规则

# 链管理命令(这都是立即生效的)
-P, --policy chain target :为指定的链 chain 设置策略 target。注意,只有内置的链才允许有策略,用户自定义的是不允许的。
-F, --flush [chain] 清空指定链 chain 上面的所有规则。如果没有指定链,清空该表上所有链的所有规则。
-N, --new-chain chain 用指定的名字创建一个新的链。
-X, --delete-chain [chain] :删除指定的链,这个链必须没有被其它任何规则引用,而且这条上必须没有任何规则。如果没有指定链名,则会删除该表中所有非内置的链。
-E, --rename-chain old-chain new-chain :用指定的新名字去重命名指定的链。这并不会对链内部照成任何影响。
-Z, --zero [chain] :把指定链,或者表中的所有链上的所有计数器清零。

-j, --jump target <指定目标> :即满足某条件时该执行什么样的动作。target 可以是内置的目标,比如 ACCEPT,也可以是用户自定义的链。
-h:显示帮助信息;

参考链接

https://wangchujiang.com/linux-command/c/iptables.html

安装screen

yum install -y screen

创建一个新的窗口

screen -S sqlite

创建sqlite3-to-mysql.py

由于sqlite3导出后的sql语句与mysql的sql语句还是有较大区别的,所以我们需要一个脚本处理一下。

1
2
3
4
5
6
7
8
9
10
11
12
13
14
15
16
17
18
19
20
21
22
23
24
25
26
27
28
29
30
31
32
33
34
35
36
37
38
39
40
41
42
43
44
45
46
47
48
49
50
51
52
53
54
55
56
57
58
59
60
61
62
63
64
65
66
67
68
69
70
71
72
73
74
75
76
77
78
79
80
81
82
83
84
85
86
87
88
89
90
91
92
93
94
95
96
97
98
99
100
101
#! /usr/bin/env python
import re
import fileinput
from optparse import OptionParser
import sys


IGNOREDPREFIXES = [
'PRAGMA',
'BEGIN TRANSACTION;',
'COMMIT;',
'DELETE FROM sqlite_sequence;',
'INSERT INTO "sqlite_sequence"',
]


def _replace(line):
if any(line.lower().startswith(prefix.lower()) for prefix in IGNOREDPREFIXES):
return

line = re.sub("AUTOINCREMENT", "AUTO_INCREMENT", line, flags=re.IGNORECASE)
line = re.sub("boolean", "TINYINT(1)", line, flags=re.IGNORECASE)
line = re.sub("boolean DEFAULT 't'", "TINYINT(1) DEFAULT 1", line, flags=re.IGNORECASE)
line = re.sub("boolean DEFAULT 'f'", "TINYINT(1) DEFAULT 0", line, flags=re.IGNORECASE)
line = re.sub("DEFAULT 't'", "DEFAULT 1", line, flags=re.IGNORECASE)
line = re.sub("DEFAULT 'f'", "DEFAULT 0", line, flags=re.IGNORECASE)
# line = re.sub(",'t'", ",1", line, flags=re.IGNORECASE)
# line = re.sub(",'f'", ",0", line, flags=re.IGNORECASE)
line = re.sub("TINYINT(1) DEFAULT 0 NOT NULL", "TINYINT(1) NOT NULL DEFAULT 0", line, flags=re.IGNORECASE)
line = re.sub("TINYINT(1) DEFAULT 1 NOT NULL", "TINYINT(1) NOT NULL DEFAULT 1", line, flags=re.IGNORECASE)
line = re.sub("varchar ", "varchar(255) ", line, flags=re.IGNORECASE)
line = re.sub("varchar,", "varchar(255),", line, flags=re.IGNORECASE)
line = re.sub("varchar\)", "varchar(255))", line, flags=re.IGNORECASE)
return line


def _backticks(line, in_string):
"""Replace double quotes by backticks outside (multiline) strings

>>> _backticks('''INSERT INTO "table" VALUES ('"string"');''', False)
('INSERT INTO `table` VALUES (\\'"string"\\');', False)

>>> _backticks('''INSERT INTO "table" VALUES ('"Heading''', False)
('INSERT INTO `table` VALUES (\\'"Heading', True)

>>> _backticks('''* "text":http://link.com''', True)
('* "text":http://link.com', True)

>>> _backticks(" ');", True)
(" ');", False)

"""
new = ''
for c in line:
if not in_string:
if c == "'":
in_string = True
elif c == '"':
new = new + '`'
continue
elif c == "'":
in_string = False
new = new + c
return new, in_string


def _process(opts, lines):
if opts.database:
yield '''\
drop database if exists {d};
create database {d} character set utf8;
grant all on {d}.* to {u}@'%' identified by '{p}';
use {d};\n'''.format(d=opts.database, u=opts.username, p=opts.password)
yield "SET sql_mode='NO_BACKSLASH_ESCAPES';\n"

in_string = False
for line in lines:
if not in_string:
line = _replace(line)
if line is None:
continue
line, in_string = _backticks(line, in_string)
yield line


def main():
op = OptionParser()
op.add_option('-d', '--database')
op.add_option('-u', '--username')
op.add_option('-p', '--password')
opts, args = op.parse_args()

lines = (l for l in fileinput.input(args))
for line in _process(opts, lines):
# sys.stdout.write(line)
print line,


if __name__ == "__main__":
main()

执行脚本

1
sqlite3 test.db .dump | python sqlite3-to-mysql.py -u m_user -p m_password -d m_database | mysql -u root -p --default-character-set=utf8

对于比较大的数据库,会耗时较长,所以一定要放在screen下执行,防止意外断开连接。

screen的使用

如果意外断开ssh链接,怎么重新登入?

1
screen -ls

会显示会话列表

重新连接会话id

1
screen -r 12865

附:mysql数据库导出导入

导出

1
mysqldump -u user -p database | gzip > database.sql.gz

导入

1
gunzip < database.sql.gz | mysql -u user -p database

参考链接

http://www.redmine.org/boards/2/topics/12793
https://www.cnblogs.com/mchina/archive/2013/01/30/2880680.html

安装 Docker / Git

`wget -qO- https://get.docker.io/ | sh`

安装 Discourse

创建 /var/discourse 文件夹,克隆官方 Discourse Docker 镜像 239至其中,然后在拷贝一个配置文件,并命名为 app.yml:

1
2
3
4
mkdir /var/discourse
git clone https://github.com/discourse/discourse_docker.git /var/discourse
cd /var/discourse
cp samples/standalone.yml containers/app.yml

编辑 Discourse 配置文件

配置文件是 YAML 格式,请不要删除配置项“:”前的内容。

在 app.yml 中编辑 Discourse 配置:

1
vi containers/app.yml
  • 将 params 中的 version 前的注释符号 # 去掉,然后设置其为最稳定的 stable(正式版)。其他还有两个分支可以选择,分别是 beta(测试版) 和 tests-passed(预览版)。beta 更新比 stable 快,如果想帮助反馈问题和试用新特性,可以较为安全的使用。tests-passed 和主线开发版本非常近,但不稳定。

  • 在 env 中增加 DISCOURSE_DEFAULT_LOCALE,并设为您想用的语言,比如简体中文 zh_CN。Discourse 初始化时会自动创建一些分类和主题,这样可以初始化成简体中文。如果在此设置了语言,在站点设置中将无法修改站点语言,但是你总是可以在配置文件中更改语言并重建容器。

  • 如果是在墙内部署,添加 web.china.template.yml 模板,具体方法见:在大陆地区的云上部署 Discourse。

  • 将 DISCOURSE_DEVELOPER_EMAILS 改为您的邮件地址。

  • 将 DISCOURSE_HOSTNAME 设置为 discourse.example.com,意思是您想要您的 Discourse 可以通过 http://discourse.example.com/ 访问。您需要更新您的 DNS 的 A 记录,使其指向您服务器的 IP 地址。

  • 将您邮件发送的验证信息填在 DISCOURSE_SMTP_ADDRESS、DISCOURSE_SMTP_PORT、DISCOURSE_SMTP_USER_NAME和DISCOURSE_SMTP_PASSWORD。如果需要的话请确定删掉了这几行前面的多余空格和 # 字符。

  • 如果您在使用 1 GB 的服务器,将 UNICORN_WORKERS 设为 2,db_shared_buffers设为 128MB,以节省内存。

[root@iZ11bl9iw4xZ discourse]# ./launcher bootstrap app
Your Docker installation is not using a supported storage driver. If we were to proceed you may have a broken install.
aufs is the recommended storage driver, although zfs and overlay2 may work as well.
Other storage drivers are known to be problematic.
You can tell what filesystem you are using by running “docker info” and looking at the ‘Storage Driver’ line.

If you wish to continue anyway using your existing unsupported storage driver,
read the source code of launcher and figure out how to bypass this check.

vi /usr/lib/systemd/system/docker.service

ExecStart=/usr/bin/dockerd-current
–storage-driver=aufs \

docker重启后启动失败Failed to start Docker Application Container Engine.
请把rm -rf /var/lib/docker/一并删除

https://www.orgleaf.com/3098.html

CentOS7配置支持AUFS文件系统

https://www.jianshu.com/p/63fdb0c0659c

[root@iZ11bl9iw4xZ discourse]# ./launcher bootstrap app
ERROR: Docker version 1.13.1 not supported, please upgrade to at least 17.03.1, or recommended 17.06.2

wget -qO- https://get.docker.com/ | sh

ls /lib/systemd/system | grep docker
yum list installed | grep docker

yum -y remove docker-ce.x86_64 docker-ce-cli.x86_64 containerd.io.x86_64

git克隆项目的时候出现标题中的错误

1
fatal: unable to access 'xxx.git/': Peer reports incompatible or unsupported protocol version.

安装相关库

1
yum update -y nss curl libcurl

github推出免费私人仓库已经很久了,之前的代码都放在bitbucket上面,今天迁移了一个到github上面

1
2
3
4
5
6
7
cd $HOME/Code/repo-directory
git remote rename origin bitbucket
git remote add origin https://github.com/leadscloud/leadscloud.github.io.git
git push origin master

git remote rm bitbucket

上面的方法可以保留所有的提交记录。

设置代理

1
2
git config --global http.proxy 'socks5://127.0.0.1:1080'
git config --global https.proxy 'socks5://127.0.0.1:1080'

取消代理

1
2
git config --global --unset http.proxy
git config --global --unset https.proxy

列出配置清单

1
git config --global -l
0%