leadscloud

Google SEO|外贸营销推广

写了一个shell脚本,可以快速的添加域名并同时创建好ftp账号和mysql账号,如果需要安装 wordpress在参数中选择即可。

脚本地址: https://github.com/leadscloud/leadscloud.github.io/blob/master/soft/bulk_vhost.sh

安装方式

1
wget -O bulk_vhost.sh http://leadscloud.github.io/soft/bulk_vhost.sh && chmod u+x bulk_vhost.sh

示例说明

/root/bulk_vhost.sh -h 会显示详细说明

1
2
3
4
/root/bulk_vhost.sh -d "love4026.org sbmzhcn.com" -fm # 快速添加域名 ftp mysql
/root/bulk_vhost.sh -d love4026.org -fm -a wordpress # 快速添加域名 ftp mysql 并安装wordpress
/root/bulk_vhost.sh -d love4026.org -fm -a wordpress -r wordpress
/root/bulk_vhost.sh -d love4026.org -fml

ServerStatus是一款python探针,英文原版项目 | 中文版项目

ServerStatus是一个用Python开发的探针的多主机探针,可以简单实现负载、网络、流量、CPU、内存和磁盘等参数的监控

下载ServerStatus

1
git clone https://github.com/cppla/ServerStatus
    其中Server为服务器端主程序,Client为客户端探针,而Web文件夹中则是探针的页面部分

安装

1
2
cd ServerStatus/server
make

运行

1
2
3
4
./sergate

[server]: Bound to :35601 这是正常状态的显示
[server]: Couldn't open socket. Port (35601) might already be in use. 这种状态是35601端口被占用

服务器端配置

然后需要修改config.json文件,注意username, password的值要与客户端保持一致

修改完成之后,可以把编译完成的程序和配置文件放到/usr/local/bin和/etc下

1
2
cp -r ./sergate /usr/local/bin/
cp -r ./config.json /etc/sergate.json

下面到探针页面派上用场的时候了,回到根目录下,复制ServerStatus/web到你的网站路径

1
cp -r ServerStatus/web/* /home/wwwroot/yourwebsite/status

一切配置完成之后,可以启动服务端了

1
sergate --config=/etc/sergate.json --web-dir=/home/wwwroot/yourwebsite/status

客户端配置

客户端有两个版本,client-linux为普通的linux版本,client-psutil为跨平台版本

如果普通版配置不成功,可以换成跨平台的版本试试,首先进入客户端的目录

1
cd ServerStatus/client

客户端的配置很简单,只需要修改相应的参数,首先vim client-linux.py修改SERVER地址,username帐号, password密码,然后python client-linux.py运行无错误就可以了。

跨平台版本也一样,但是要先安装psutil跨平台依赖库,然后和普通版一样vim client-psutil.py修改SERVER地址,username帐号, password密码,最后python client-psutil.py运行无错误就大功告成。

为了方便管理,可以把client-linux.py或client-psutil.py也复制到/usr/local/bin或者/opt下

设置Systemd服务

服务端脚本示例 /etc/systemd/system/serverstatus-server.service

1
2
3
4
5
6
7
8
9
10
11
[Unit]
Description=ServerStatus Server Daemon
Wants=network.target

[Service]
Type=simple
ExecStart=/usr/local/bin/sergate --config=/etc/sergate.json --web-dir=/data/wwwroot/status

[Install]
WantedBy=multi-user.target

执行以下命令安装并启动

1
2
3
systemctl daemon-reload
systemctl enable serverstatus-server.service
systemctl start serverstatus-server.service

客户端脚本示例 /etc/systemd/system/serverstatus-client.service

1
2
3
4
5
6
7
8
9
10
[Unit]
Description=ServerStatus Client Prober
Wants=network.target

[Service]
Type=simple
ExecStart=/usr/bin/python3 /opt/client-linux.py

[Install]
WantedBy=multi-user.target

执行以下脚本安装并启动

1
2
3
systemctl daemon-reload
systemctl enable serverstatus-client.service
systemctl start serverstatus-client.service

今天去了新密的神仙洞,上山那段路弯弯曲曲不好走,路况不太好,花了半小时,神仙洞是个溶洞,比较狭长,里面的景色一般,很多场景被赋予的故事比较牵强,不过里面的温度比较低,很凉快,看看景色还行,门票40,团购30比较划算,停车需要十块。


新乡潞王陵门票50,坐落村庄中,之前被监狱占着后搬走,里面还不错,两个墓室都被盗光,可以到地宫看看,阴冷。


内核参数优化

第一步,增加系统文件描述符的最大限数

编辑文件 limits.conf

1
vi /etc/security/limits.conf

增加以下两行

1
2
* soft nofile 51200
* hard nofile 51200

启动shadowsocks服务器之前,设置以下参数

ulimit -n 51200

第二步,调整内核参数

修改配置文件 /etc/sysctl.conf

1
2
3
4
5
6
7
8
9
10
11
12
13
14
15
16
17
18
19
20
fs.file-max=65535

net.core.rmem_max = 67108864
net.core.wmem_max = 67108864
net.core.netdev_max_backlog = 250000
net.core.somaxconn = 4096

net.ipv4.tcp_syncookies = 1
net.ipv4.tcp_tw_reuse = 1
net.ipv4.tcp_tw_recycle = 0
net.ipv4.tcp_fin_timeout = 30
net.ipv4.tcp_keepalive_time = 1200
net.ipv4.ip_local_port_range = 10000 65000
net.ipv4.tcp_max_syn_backlog = 8192
net.ipv4.tcp_max_tw_buckets = 5000
net.ipv4.tcp_fastopen = 3
net.ipv4.tcp_rmem = 4096 87380 67108864
net.ipv4.tcp_wmem = 4096 65536 67108864
net.ipv4.tcp_mtu_probing = 1
#net.ipv4.tcp_congestion_control = hybla

修改后执行 sysctl -p 使配置生效

锐速

锐速是一款非常不错的TCP底层加速软件,可以非常方便快速地完成服务器网络的优化,配合 ShadowSocks 效果奇佳。目前锐速官方也出了永久免费版本,适用带宽20M、3000加速连接,个人使用是足够了。如果需要,先要在锐速官网注册个账户。

然后确定自己的内核是否在锐速的支持列表里,如果不在,请先更换内核,如果不确定,请使用 手动安装。

确定自己的内核版本在支持列表里,就可以使用以下命令快速安装了。

1
2
3
wget http://my.serverspeeder.com/d/ls/serverSpeederInstaller.tar.gz
tar xzvf serverSpeederInstaller.tar.gz
bash serverSpeederInstaller.sh

输入在官网注册的账号密码进行安装,参数设置直接回车默认即可,
最后两项输入 y 开机自动启动锐速,y 立刻启动锐速。之后可以通过lsmod查看是否有appex模块在运行。

到这里还没结束,我们还要修改锐速的3个参数,vi /serverspeeder/etc/config

1
2
3
rsc="1" #RSC网卡驱动模式
advinacc="1" #流量方向加速
maxmode="1" #最大传输模式

digitalocean vps的网卡支持rsc和gso高级算法,所以可以开启rsc=”1”,gso=”1”。

重新启动锐速

1
service serverSpeeder restart

1
2
3
sudo yum install python-setuptools
sudo easy_install pip
sudo pip install supervisor

如果出现错误使用 easy_install supervisor 安装。

配置Supervisor

安装好后,需要合建配置文件

1
2
3
4
5
6
7
echo_supervisord_conf > supervisord.conf
sudo cp supervisord.conf /etc/supervisord.conf
sudo mkdir /etc/supervisord.d/
sudo vi /etc/supervisord.conf
# 把下面的这两行的注释去掉,如果没有加上即可。
[include]
files = /etc/supervisord.d/*.conf

配置文件

创建一个配置文件到/etc/supervisord.d/ 比如 /etc/supervisord.d/shadowsocks.conf

文件内容为

1
2
3
4
5
6
7
8
9
10
11
12
13
14
[program: ] (  is name of program)
command=/bin/ //Execute command
process_name=%(program_name)s //if your numprocs is more than 1 it should be %(program_name)s_%(process_num)02d
numprocs=1 //Number of your concurrent process Perfect for gearman
directory=/tmp //cd this directory before running
priority=999 //priority or program maximum is 999
autostart=true
autorestart=true
startretries=3 //number of retrying times if process is die
stopwaitsecs=10 //waiting xx second before before stop
user=chrism //exec by user should be “root”
//Log control
stdout_logfile=/a/path
stdout_logfile_maxbytes=1MB

shadowsocks的文件内容为

1
2
3
4
[program:shadowsocks] 
command=python /dir/server.py -c /dir/config.json
autorestart=true
user=root

设置开机启动

1
2
3
4
5
6
7
8
9
10
11
12
13
14
15
16
17
18
19
20
21
22
23
24
25
26
27
28
29
30
31
32
33
34
35
36
37
38
39
40
41
42
43
44
45
46
47
48
49
50
51
52
53
54
55
56
57
58
59
60
61
62
63
sudo vi /etc/rc.d/init.d/supervisord
#!/bin/sh
#
# /etc/rc.d/init.d/supervisord
#
# Supervisor is a client/server system that
# allows its users to monitor and control a
# number of processes on UNIX-like operating
# systems.
#
# chkconfig: - 64 36
# description: Supervisor Server
# processname: supervisord

# Source init functions
. /etc/rc.d/init.d/functions

prog="supervisord"

prefix="/usr/"
exec_prefix="${prefix}"
prog_bin="${exec_prefix}/bin/supervisord"
PIDFILE="/var/run/$prog.pid"

start()
{
echo -n $"Starting $prog: "
daemon $prog_bin --pidfile $PIDFILE -c /etc/supervisord.conf
[ -f $PIDFILE ] && success $"$prog startup" || failure $"$prog startup"
echo
}

stop()
{
echo -n $"Shutting down $prog: "
[ -f $PIDFILE ] && killproc $prog || success $"$prog shutdown"
echo
}

case "$1" in

start)
start
;;

stop)
stop
;;

status)
status $prog
;;

restart)
stop
start
;;

*)
echo "Usage: $0 {start|stop|restart|status}"
;;

esac

再执行以下命令

1
2
3
4
sudo chmod +x /etc/rc.d/init.d/supervisord
sudo chkconfig --add supervisord
sudo chkconfig supervisord on
sudo service supervisord start

网页界面查看

修改/etc/

1
2
;[inet_http_server]         ; inet (TCP) server disabled by default
;port=*:9001 ; (ip_address:port specifier, *:port for all iface)

改为(即去掉注释)

1
2
[inet_http_server]         ; inet (TCP) server disabled by default
port=*:9001 ; (ip_address:port specifier, *:port for all iface)

在浏览器输入http://Host:9001 就可以查看了。

参考资料

https://medium.com/@thangman22/how-to-control-your-deamon-with-supervisord-on-centos-4ec4658205bf
https://rayed.com/wordpress/?p=1496

1
2
3
4
5
6
7
8
9
10
11
12
13
14
15
16
17
18
19
20
21
22
23
24
25
26
27
28
29
30
31
32
33
34
35
36
37
38
39
40
41
42
43
44
45
46
47
48
from Queue import Queue

import threading
import random
import time

class ProduceToQueue( threading.Thread ):
def __init__( self, threadName, queue ):
threading.Thread.__init__( self, name = threadName )
self.sharedObject = queue

def run( self ):
for i in range( 11, 21 ):
time.sleep( random.randrange( 4 ) )
print "%s adding %s to queue" % ( self.getName(), i )
self.sharedObject.put( i )

print self.getName(), "finished producing values"
print "Terminating", self.getName()

class ConsumeFromQueue( threading.Thread ):
def __init__( self, threadName, queue ):
threading.Thread.__init__( self, name = threadName )
self.sharedObject = queue

def run( self ):
sum = 0
current = 10

for i in range( 10 ):
time.sleep( random.randrange( 4 ) )
print "%s attempting to read %s..." % ( self.getName(), current + 1 )
current = self.sharedObject.get()
print "%s read %s" % ( self.getName(), current )
sum += current

print "%s retrieved values totaling: %d" % ( self.getName(), sum )
print "Terminating", self.getName()

queue = Queue()
producer = ProduceToQueue( "Producer", queue )
consumer = ConsumeFromQueue( "Consumer", queue )

producer.start()
consumer.start()

producer.join()
consumer.join()

apache日志分析可以获得很多有用的信息,现在来试试最基本的,获取最多访问的前10个IP地址及访问次数。
既然是统计,那么awk是必不可少的,好用而高效。

命令如下:

awk '{a[$1] += 1;} END {for (i in a) printf("%d %s\n", a[i], i);}' 日志文件 | sort -n | tail

首先用awk统计出来一个列表,然后用sort进行排序,最后用tail取最后的10个。
以上参数可以略作修改显示更多的数据,比如将tail加上-n参数等,另外日志格式不同命令也可能需要稍作修改。
当前WEB服务器中联接次数最多的ip地址

1
#netstat -ntu |awk '{print $5}' |sort | uniq -c| sort -nr

查看日志中访问次数最多的前10个IP

1
#cat access_log |cut -d ' ' -f 1 |sort |uniq -c | sort -nr | awk '{print $0 }' | head -n 10 |less

查看日志中出现100次以上的IP

1
#cat access_log |cut -d ' ' -f 1 |sort |uniq -c | awk '{if ($1 > 100) print $0}'sort -nr |less

查看最近访问量最高的文件

1
#cat access_log |tail -10000|awk '{print $7}'|sort|uniq -c|sort -nr|less

查看日志中访问超过100次的页面

1
#cat access_log | cut -d ' ' -f 7 | sort |uniq -c | awk '{if ($1 > 100) print $0}' | less

统计某url,一天的访问次数

1
#cat access_log|grep '12/Aug/2009'|grep '/images/index/e1.gif'|wc|awk '{print $1}'

前五天的访问次数最多的网页

1
#cat access_log|awk '{print $7}'|uniq -c |sort -n -r|head -20

从日志里查看该ip在干嘛

1
#cat access_log | grep 218.66.36.119| awk '{print $1"\t"$7}' | sort | uniq -c | sort -nr | less

列出传输时间超过 30 秒的文件

1
#cat access_log|awk '($NF > 30){print $7}' |sort -n|uniq -c|sort -nr|head -20

列出最最耗时的页面(超过60秒的)

1
#cat access_log |awk '($NF > 60 && $7~/\.php/){print $7}' |sort -n|uniq -c|sort -nr|head -100

纯文本验证码、图形验证码、声音验证码、JS验证码,以下主要讲简单的图形验证码的识别。

在破解验证码中需要用到的知识一般是 像素,线,面等基本2维图形元素的处理和色差分析。常见工具为:

  • 支持向量机(SVM)
    支持向量机SVM是一个机器学习领域里常用到的分类器,可以对图形进行边界区分,不过需要的背景知识太高深。
  • OpenCV
    OpenCV是一个很常用的计算机图像处理和机器视觉库,一般用于人脸识别,跟踪移动物体等等。
  • 图像处理软件(Photoshop,Gimp…)
  • Python Image Library
    Python Image Library是pyhon里面带的一个图形处理库,功能比较强大,是我们的首选。

识别验证码需要充分利用图片中的信息,才能把验证码的文字和背景部分分离,一张典型的jpeg图片,每个像素都可以放在一个5维的空间里,这5个维度分别是,X,Y,R,G,B,也就是像素的坐标和颜色,在计算机图形学中,有很多种色彩空间,最常用的比如RGB,印刷用的CYMK,还有比较少见的HSL或者HSV,每种色彩空间的维度都不一样,但是可以通过公式互相转换。

RGB色彩空间构成的立方体,每个维度代表一种颜色

HSL(色相饱和度)色彩空间构成的锥体,可以参考:
https://zh.wikipedia.org/wiki/HSL%E5%92%8CHSV%E8%89%B2%E5%BD%A9%E7%A9%BA%E9%97%B4
HSL和HSV都是一种将RGB色彩模型中的点在圆柱坐标系中的表示法。这两种表示法试图做到比RGB基于笛卡尔坐标系的几何结构更加直观。
HSL即色相、饱和度、亮度(英语:Hue, Saturation, Lightness),又称HSL。HSV即色相、饱和度、明度(英语:Hue, Saturation, Value),又称HSB,其中B即英语:Brightness。

  • 色相(H)是色彩的基本属性,就是平常所说的颜色名称,如红色、黄色等。
  • 饱和度(S)是指色彩的纯度,越高色彩越纯,低则逐渐变灰,取0-100%的数值。
  • 明度(V),亮度(L),取0-100%。

了解到色彩空间的原理,就可以用在该空间适用的公式来进行像素的色差判断,比如RGB空间里判断两个点的色差可以用3维空间中两坐标求距离的公式:
distance=sqrt[(r1-r2)^2+(g1-g2)^2+(b1-b2)^2]
更加直观的图片,大家感受一下:

随便把一张图片的每个像素都映射到RGB色彩空间里就能获得一个这样的立方体。
通过对像素颜色进行统计和区分,可以获得图片的颜色分布,在验证码中,一般来说使用近似颜色最多的像素都是背景,最少的一般为干扰点,干扰线和需要识别文字本身。

验证码识别的原理和过程

第一步: 二值化

所谓二值化就是把不需要的信息通通去除,比如背景,干扰线,干扰像素等等,只剩下需要识别的文字,让图片变成2进制点阵。

第二步: 文字分割

为了能识别出字符,需要对要识别的文字图图片进行分割,把每个字符作为单独的一个图片看待。

第三步:标准化

对于部分特殊的验证码,需要对分割后的图片进行标准化处理,也就是说尽量把每个相同的字符都变成一样的格式,减少随机的程度
最简单的比如旋转还原,复杂点的比如扭曲还原等等

第四步:识别

这一步可以用很多种方法,最简单的就是模板对比,对每个出现过的字符进行处理后把点阵变成字符串,标明是什么字符后,通过字符串对比来判断相似度。
在文章的后半部分会详细解释每步的各种算法

二值化算法

直方图

这是一张图像的亮度(Luminosity)+RGB三通道的直方图。

直方图的观看规则就是“左黑右白”,左边代表暗部,右边代表亮部,而中间则代表中间调。亮度从0–255,0表示黑,255表示白。如果某个地方的峰越高,表示在这个亮度下的像素越多。这个相片的直方图说明图片整体是偏亮的。

纵向上的高度代表像素密集程度,越高,代表的就是分布在这个亮度上的像素很多。

先建立一个图像中的颜色直方图,通过把所有像素按颜色分组实现

1
2
3
4
5
6
from PIL import Image

im = Image.open("captcha.gif")
im = im.convert("P")

print im.histogram()

输出

    [0, 0, 0, 0, 0, 0, 0, 0, 0, 0, 0, 0, 0, 0, 0, 0, 0, 0, 0, 0, 0, 0, 0, 0, 0, 0, 0
    , 0, 0, 0, 0, 0, 0, 0, 0, 0, 0, 0, 0, 0, 0, 0, 0, 1, 1, 0, 0, 0, 0, 0, 0, 0, 0,
    1, 0, 0, 2, 0, 0, 0, 0, 1, 0, 0, 0, 0, 0, 2, 1, 0, 0, 0, 0, 0, 0, 0, 0, 0, 0, 1,
    0, 0, 0, 0, 1, 0, 0, 0, 0, 0, 0, 2, 1, 0, 0, 0, 2, 0, 0, 0, 0, 1, 0, 1, 1, 0, 0
    , 1, 0, 2, 0, 0, 0, 0, 0, 0, 0, 0, 0, 0, 0, 1, 2, 0, 0, 0, 1, 2, 0, 1, 0, 0, 1,
    0, 2, 0, 0, 1, 0, 0, 2, 0, 0, 0, 0, 0, 0, 0, 0, 1, 0, 1, 0, 1, 0, 3, 1, 3, 3, 0,
    0, 0, 0, 0, 0, 1, 0, 3, 2, 132, 1, 1, 0, 0, 0, 1, 2, 0, 0, 0, 0, 0, 0, 0, 15, 0
    , 1, 0, 1, 0, 0, 8, 1, 0, 0, 0, 0, 1, 6, 0, 2, 0, 0, 0, 0, 18, 1, 1, 1, 1, 1, 2,
    365, 115, 0, 1, 0, 0, 0, 135, 186, 0, 0, 1, 0, 0, 0, 116, 3, 0, 0, 0, 0, 0, 21,
    1, 1, 0, 0, 0, 2, 10, 2, 0, 0, 0, 0, 2, 10, 0, 0, 0, 0, 1, 0, 625]
1
2
3
4
5
6
7
8
9
10
11
12
13
14
15
from PIL import Image
from operator import itemgetter

im = Image.open("captcha.gif")
im = im.convert("P")
his = im.histogram()

values = {}

for i in range(256):
values[i] = his[i]

for j,k in sorted(values.items(), key=itemgetter(1), reverse=True)[:10]:
print j,k

1
2
3
4
5
6
7
8
9
10
255 625
212 365
220 186
219 135
169 132
227 116
213 115
234 21
205 18
184 15

第一列是颜色的ID,第二列是相对应的颜色的数量,图片中可见白色最多,其次是灰色和红色
上面显示一共有10个颜色在这个图片中,红色应该是第三个常见颜色220,但是上面中227与220非常接近,把它也包含进去。这张图中220 与227应该是红色部分,也就是我们想保留的验证码部分,其它颜色可以去掉, 创建一个新的二色图像,只有白黑。

1
2
3
4
5
6
7
8
9
10
11
12
13
14
15
16
17
18
from PIL import Image

im = Image.open("captcha.gif")
im = im.convert("P")
im2 = Image.new("P",im.size,255)

im = im.convert("P")

temp = {}

for x in range(im.size[1]):
for y in range(im.size[0]):
pix = im.getpixel((y,x))
temp[pix] = pix
if pix == 220 or pix == 227: # these are the numbers to get
im2.putpixel((y,x),0)

im2.save("output.gif")

上面这个黑白图片便是我们成功提取到的只有字母数字的图像,正是我们需要的,如果图片中的验证码是多个颜色,判断上面会相应复杂一些。

1
2
3
4
5
6
7
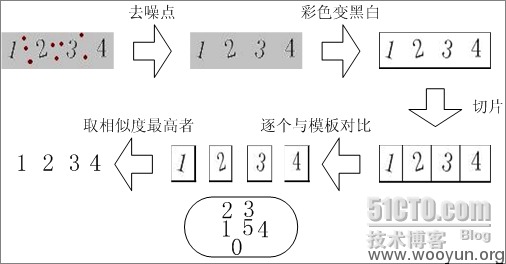
for each binary image:
for each pixel in the binary image:
if the pixel is on:
if any pixel we have seen before is next to it:
add to the same set
else:
add to a new set

二值化处理的另外一种算法

1
2
3
4
5
6
7
8
9
10
11
12
13
14
15
16
17
18
19
20
21
22
23
24
25
26
27
#!/usr/bin/env python
# -*- coding: UTF-8 -*-
#图像二值处理
import os
from PIL import Image
j=1
dir="./pic/"
path = "./font/"
for f in os.listdir(dir):
if f.endswith(".gif"):
img = Image.open(dir+f) # 读入图片
img = img.convert("RGBA")
pixdata = img.load()
#二值化
for y in xrange(img.size[1]):
for x in xrange(img.size[0]):
if pixdata[x, y][0] < 90:
pixdata[x, y] = (0, 0, 0, 255)
for y in xrange(img.size[1]):
for x in xrange(img.size[0]):
if pixdata[x, y][1] < 136:
pixdata[x, y] = (0, 0, 0, 255)
for y in xrange(img.size[1]):
for x in xrange(img.size[0]):
if pixdata[x, y][2] > 0:
pixdata[x, y] = (255, 255, 255, 255)
img.save(path+f, "GIF")

切割字符

主要代码

1
2
3
4
5
6
7
8
9
10
11
12
13
14
15
16
17
18
19
20
21
22
23
24
25
26
27
28
29
30
31
32
33
34
35
36
37
38
39
40
41
42
from PIL import Image

im = Image.open("captcha.gif")
im = im.convert("P")
im2 = Image.new("P",im.size,255)

im = im.convert("P")

temp = {}

for x in range(im.size[1]):
for y in range(im.size[0]):
pix = im.getpixel((y,x))
temp[pix] = pix
if pix == 220 or pix == 227: # these are the numbers to get
im2.putpixel((y,x),0)

# new code starts here

inletter = False
foundletter=False
start = 0
end = 0

letters = []

for y in range(im2.size[0]): # slice across
for x in range(im2.size[1]): # slice down
pix = im2.getpixel((y,x))
if pix != 255:
inletter = True
if foundletter == False and inletter == True:
foundletter = True
start = y

if foundletter == True and inletter == False:
foundletter = False
end = y
letters.append((start,end))

inletter=False
print letters
1
[(6, 14), (15, 25), (27, 35), (37, 46), (48, 56), (57, 67)]

这些是每个字符在图片水平方向的开始位置与结束位置,如果验证码的每个字符的位置是固定的就不需要上面这种方法,可以直接指定。

固定位置的字符切割算法

1
2
3
4
5
6
7
8
9
10
11
12
13
14
15
#!/usr/bin/env python
# -*- coding: UTF-8 -*-
#图像分割
import os ,Image
j = 1
dir="./font/"
for f in os.listdir(dir):
if f.endswith(".gif"):
img = Image.open(dir+f)
for i in range(4):
x = 16 + i*15 #这里的数字参数需要自己
y = 2 #根据验证码图片的像素进行
img.crop((x, y, x+7, y+10)).save("fonts/%d.gif" % j) #适当的修改
print "j=",j
j += 1

接下来需要比对每个字符与模板的相似度,我们使用一种最简单的方法。但前提是我们需要生成比对的模板匹配库,可以通过以下代码生成。

1
2
3
4
5
6
7
8
9
10
# New code is here. We just extract each image and save it to disk with
# what is hopefully a unique name

count = 0
for letter in letters:
m = hashlib.md5()
im3 = im2.crop(( letter[0] , 0, letter[1],im2.size[1] ))
m.update("%s%s"%(time.time(),count))
im3.save("./%s.gif"%(m.hexdigest()))
count += 1

上面的代码会在同一目录下生成一组图像组合,每个图像都是切割出来的单个字符,每个图像都有一个唯一的哈希值命名,你可以选择你需要的字符集。

从这些字模之中,每个数字或字母,我们只需要一个看上去比较标准的就够了。

上面是我生成的模板。

批量下载验证码

为了实现匹配库,需要批量下载一些验证码。

1
2
3
4
5
6
7
8
9
10
11
12
13
14
15
16
17
18
19
20
21
22
23
24
import sys, base64
import requests
import time

def get_content():
url = "http://www.idc0310.com/userself/RndCode.asp?rndtype=LOGIN_RndCode"
url2 = 'http://www.todaynic.com/user/verpic.net?1192157892&background=d9dadb'
r = requests.get(url2)
return r.content

def content_to_file(content, num):
f = open('%s%d.png'%(file_path, num), 'wb')
f.write(content)
f.close()

def main():
times = 100
print('%d files needed.'%times)
for i in range(times):
num_of_file = i
c = get_content()
content_to_file(c, i)
print('%d files done.'%i)
time.sleep(2)

一个简单的识别程序

1
2
3
4
5
6
7
8
9
10
11
12
13
14
15
16
17
18
19
20
21
22
23
24
25
26
27
28
29
30
31
32
33
34
35
36
import os, Image

# load font modules (char, image)
fontMods = []
for i in range(10):
fontMods.append((str(i), Image.open("./good/%02d.bmp" % i)))
for i in range(26):
c = chr(ord('A') + i)
fontMods.append((c, Image.open("./good/%s.bmp" % c)))

def recognize(f):
im = Image.open(f)
im2 = im.convert('1')
# check 5 fonts
result = "./result/"
for i in range(5):
x = 10 + i*18
y = 6
target = im.crop((x, y, x+8, y+10))
points = []
for mod in fontMods:
diffs = 0
for yi in range(10):
for xi in range(8):
if mod[1].getpixel((xi, yi)) != target.getpixel((xi, yi)):
diffs += 1
points.append((diffs, mod[0]))
points.sort()
result += points[0][1]
result += ".png"
print "save to", result
im.save(result);

for imgfile in os.listdir("."):
if imgfile.endswith(".png"):
recognize(imgfile)
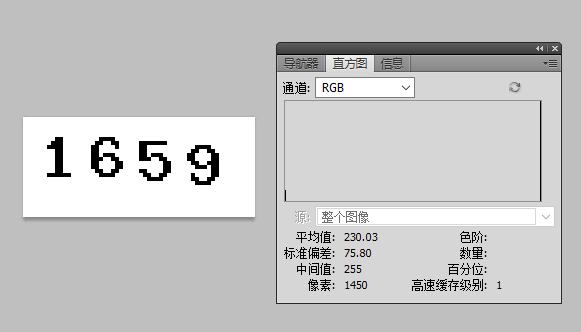
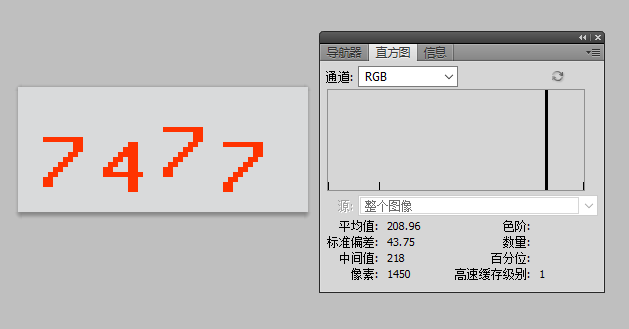
一个完整的例子

1
2
3
4
5
6
7
8
9
10
11
12
13
14
15
16
17
18
19
20
21
22
23
24
25
26
27
28
29
30
31
32
33
34
35
36
37
38
39
40
41
42
43
44
45
46
47
48
49
50
51
52
53
54
55
56
57
58
59
60
61
62
63
64
65
66
67
68
69
70
71
72
73
74
75
76
77
78
79
80
81
82
83
84
85
86
87
88
89
90
91
92
93
94
#!/usr/bin/env python
# -*- coding: utf-8 -*-
# @Author: Administrator
# @Date: 2016-01-07 10:11:09
# @Last Modified by: Administrator
# @Last Modified time: 2016-01-09 12:03:01
import os
from PIL import Image


#图像的二值化处理

def binary(f):
print(f)
img = Image.open(f)
#img = img.convert('1')
img = img.convert("RGB") # 参考文章中无该行,无该行,我这里会报错
pixdata = img.load()
for y in range(img.size[1]):
for x in range(img.size[0]):
if pixdata[x, y][0] < 90:
pixdata[x, y] = (0, 0, 0, 255)
for y in range(img.size[1]):
for x in range(img.size[0]):
if pixdata[x, y][1] < 136:
pixdata[x, y] = (0, 0, 0, 255)
for y in range(img.size[1]):
for x in range(img.size[0]):
if pixdata[x, y][2] > 0:
pixdata[x, y] = (255, 255, 255, 255)
return img
nume = 0

#图像的分割,就是验证码按字符分割出来

def division(img):
global nume
font = []
for i in range(4):
x = 2 + i*10 # 该函数中的像素值都需要自己进行微调
y = 0
temp = img.crop((x, y, x + 6, y + 10))
temp.save("./temp/%d.bmp" % nume)
nume = nume + 1
font.append(temp)
return font

#分隔出来的字符与预先定义的字体库中的结果逐个像素进行对比找出差别最小的项

def recognize(img):

fontMods = []
for i in range(10):
fontMods.append((str(i), Image.open("./num/%d.bmp" % i)))
result = ""
font = division(img)
for i in font:
target = i
points = []
print("正在比对数字:{0}".format(i))
for mod in fontMods:
print("test fontmods {0}".format(mod))
diffs = 0
for yi in range(10):
for xi in range(6):
# print(xi, yi, "mod[1].getpixel((xi, yi)):"+str(mod[1].getpixel((xi, yi))))
# print(xi, yi, "target.getpixel((xi, yi)):"+str(target.getpixel((xi, yi))))

if 0 in target.getpixel((xi, yi)):
compare = 0
else:
compare = 255

if isinstance(mod[1].getpixel((xi, yi)), int):
if mod[1].getpixel((xi, yi)) != compare:
diffs += 1
elif mod[1].getpixel((xi, yi)) != target.getpixel((xi, yi)):
diffs += 1

print("diffs:" + str(diffs))
points.append((diffs, mod[0]))
points.sort()
result += points[0][1]
return result
if __name__ == '__main__':
codedir = "./pic/"
for imgfile in os.listdir(codedir):
if imgfile.endswith(".bmp"):
dir = "./result/"
img = binary(codedir+imgfile)
num = recognize(img)
dir += (num + ".gif")
print("save to", dir)
img.save(dir)

说说12306的验证码

● 用户体验不高,故意对用户复杂但对机器不一定复杂
● 容易被枚举,题库太弱,毕竟是人采集的图片,总有上限,不如字符组合可能性多
● 破解门槛不一定高于字符型Captcha
● 任何的验证码都抵不过分布式人工打码方案

先看下网上有人试图破解的


reCAPTCHA

验证码(CAPTCHA)或者叫做全自动区分计算机和人类的图灵测试(Completely Automated Public Turing test to tell Computers and Humans Apart),使我们上网的人每天都可以见到的,而它的作用除了防止垃圾注册或者评论以外还有别的吗?来自Google的reCAPTCHA(上图)告诉我们,你其实还可以为人类做贡献。

如果我们想电子化一些从前的文档,比如 19 世纪的纽约时报,我们要不得依靠人力,手动地一个一个字地输入电脑,要不然就直接扫描,然后用软件识别。但是软件识别的准确率不能保证,尤其是扫描或者文档本身质量很差的时候,比如:

reCAPTCHA 做的,简单来说就是把上图的单词切割抽取出来,然后与一组自动生成的字符混合,生成验证码,发送到各各网站上,像这样:

reCAPTCHA 默认如果电脑产生的字符你输入正确,那么从文档中抽取的字符你的输入也将是正确的,然后通过交叉验证,重复验证,各种算法保证准确率。于是坐在电脑前上网的我们,每次输入验证码的时候,就可能顺便为某个图书馆的文档录入做出了贡献。详细点的介绍可看:关于 reCAPTCHA 验证码 。

一个经常被提到的实例就是,借助广大网民之手,纽约时报从 1851 年到现在的所有报纸,总共超过 1 千 3 百万篇文章都已经成功录入计算机。如果依靠手工输入,人力,资金,时间都将是巨大的,然而借助 reCAPTCHA, 以及每天上网的我们,这项工作短时间内已经完成了。

09 年 reCAPTCHA 被谷歌收购了,大家可能也都注意到了,谷歌更进一步利用验证码来帮助它们识别门牌号,路牌等等,用来修正谷歌地图的精度。这样谷歌地图的准确度,以及用户的体验都得到了提升。

谷歌让验证码更简单

尽管验证码在阻止垃圾邮件发送者和数字化传统文本方面非常有效,但是也有局限性。验证码没有音频选项,无法让视障人群进入被保护网站。没有视力问题的用户也抱怨,因为有些文字太难认。四年前,斯坦福大学的一群研究者收集了 30 多万个谷歌、雅虎和微软使用过的验证码,进行了一项研究。研究者在
caption-bypass.com 和亚马逊土耳其机器人系统让用户辨别验证码。研究人员向三个不同的人展示验证码,但是他们都同意正确答案的几率只有 71%。

另一个问题是利用多种多样的算法验证码也能遭到破解。今年早些时候,谷歌街景和 reCAPTCHA 团队的成员发表了一篇论文,论文内容是他们用于破解自家的验证码的一种算法。谷歌在一篇博文中表示:「我们最近的研究说明,现在的人工智能技术能以 99.8% 的正确率识别最扭曲最有难度的验证码文字。因此扭曲文字不再是一种可靠的测试方法了。」验证码还有很大的改进空间。因此诞生了 No CAPTCHA reCAPTCHA。

No CAPTCHA reCAPTCHA

谷歌最近发布了一种新的应用程序界面(API),叫做 No CAPTCHA reCAPTCHA,它大大简化了判断用户是人类与否的步骤。通过 No CAPTCHA reCAPTCHA,用户只需要简单的点击「我不是机器人」这句话边上的复选框就可以确定他们是人类了。No CAPTCHA reCAPTCHA 已经整合到了 WordPress,Snapchat 和 Humble Bundle 等服务中了。No CAPTCHA ReCAPTCHA 可能看起来更容易被垃圾邮件发送者破解,但是谷歌开发了一套复杂的高级风险分析后端在决定用户是人类的过程中分析用户参与识别的情况。

大多数用户可能很容易就点击复选框然后继续了,但是可疑的人类或者机器人可能会强制回答电脑屏幕上的验证码或者移动设备上的动物配对测试:

参考文章

http://drops.wooyun.org/tips/141
http://blog.csdn.net/shuifa2008/article/details/45692823
http://xiaoxia.org/2011/05/31/boring-entry-the-fabled-verification-code-recognition-technology-learning-notes/
http://www.codeproject.com/Articles/106583/Handwriting-Recognition-Revisited-Kernel-Support-V

0%